Predictive Coding Workflow – Relativity®
Note
As of Release 6.7 clients will no longer be able to create new Predictive Coding sessions. Existing Predictive coding sessions are not disabled, they can continue to be used in the near term. It is highly recommended that clients use CMML with ACS as a replacement for PC.
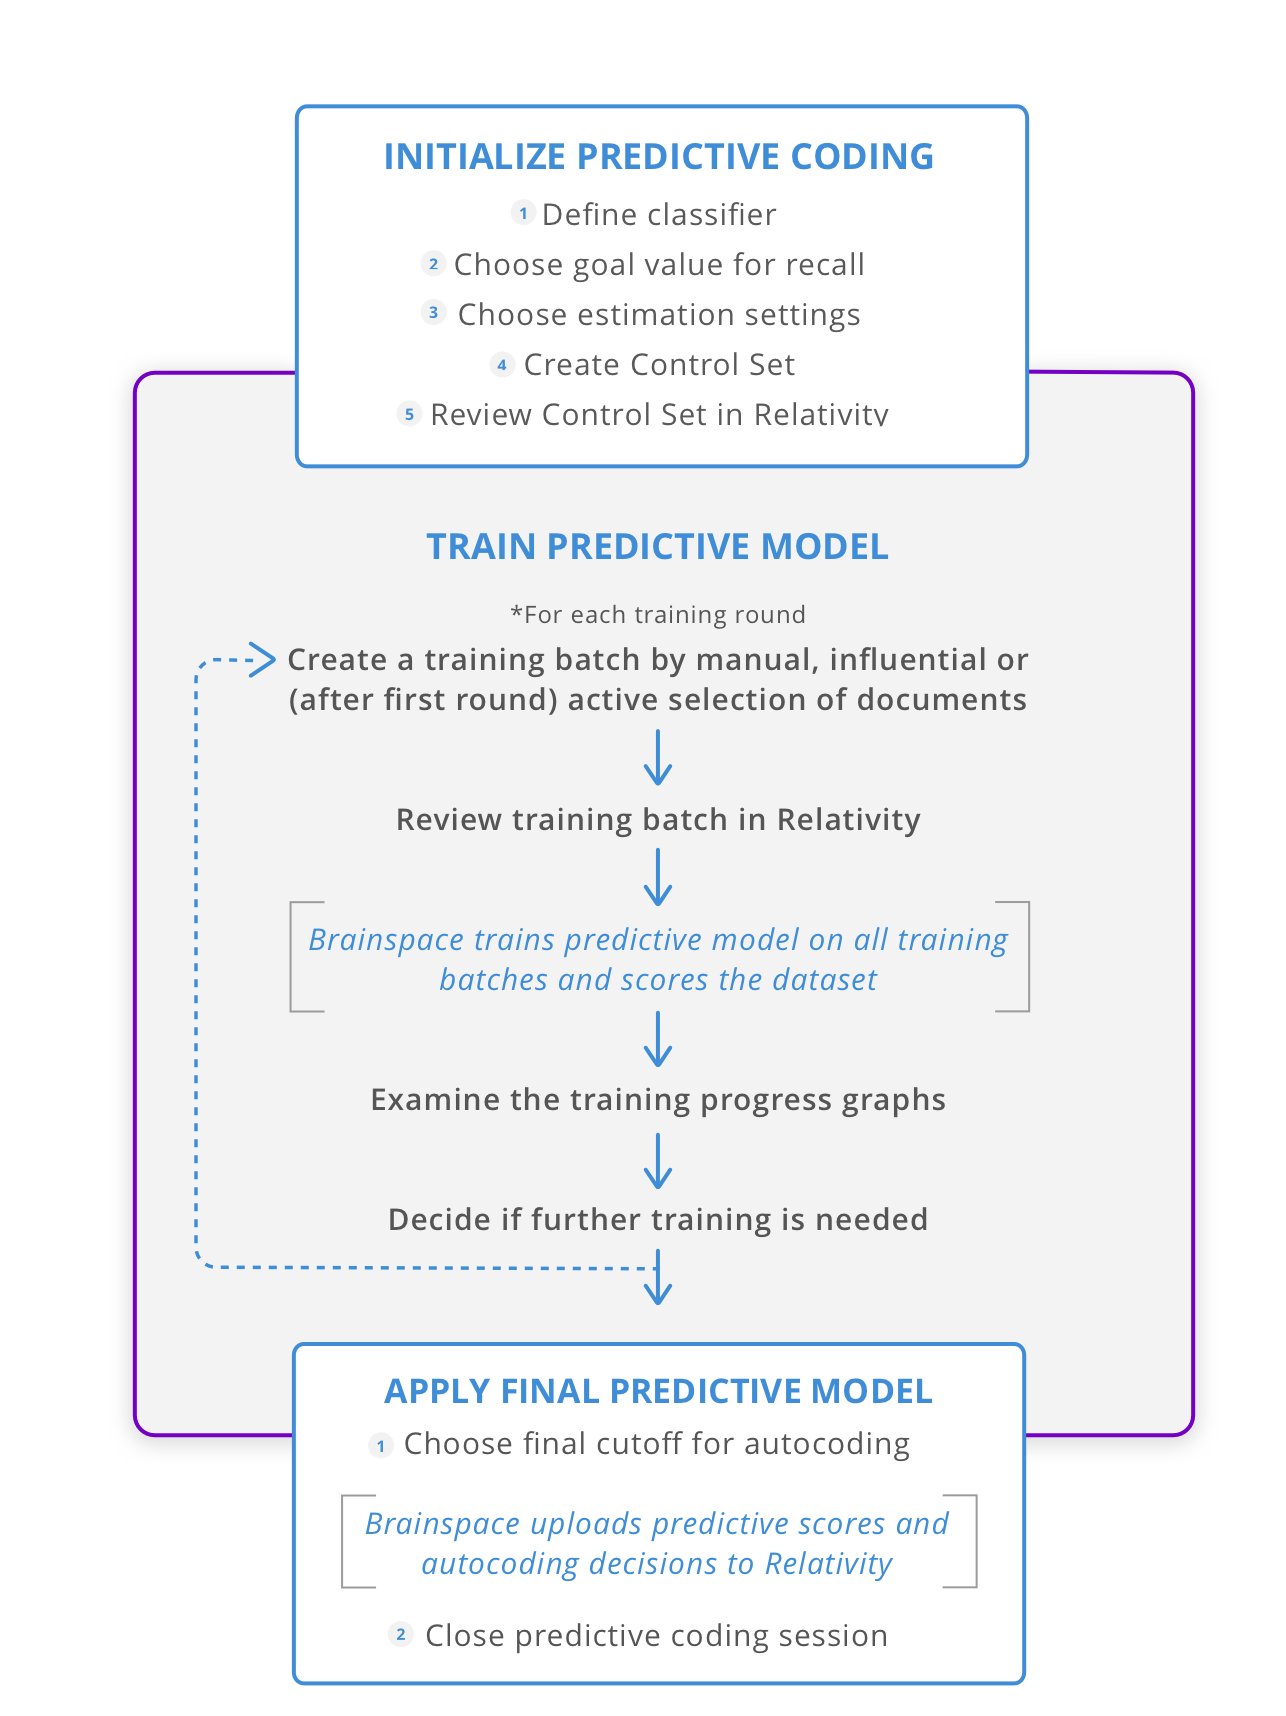
Brainspace provides a TAR 1.0-style workflow tightly integrated with review in Relativity®. The workflow is based on iterative creation of training batches that are coded in Relativity® and used by Brainspace to train a predictive model. Document scores from the predictive model are uploaded to Relativity®, along with autocoding of documents as responsive or non-responsive as determined by a user-defined cutoff score. The predictive coding workflow also uses a Control Set for estimating the effectiveness of the predictive model as training progresses.
Predictive Coding Workflow
 |
Preparing For Predictive Coding
Configuration of dataset to work with Relativity®
In order to get started in Predictive Coding you must ensure that the dataset is properly connected and active. For a walkthrough on how to set and connect Relativity® as your data source, visit Create a Dataset with a Relativity® Plus Connector.
Restrictions
There are a few limitations to acknowledge while preparing for Predictive Coding. The first restriction to mention is that only one Predictive Coding TAR 1.0 classifier (and associated Predictive Coding session) can be associated with a dataset at a given time. If there's an existing Predictive Coding session, it must be deleted before one can create a new one.
A predictive coding session can be deleted by first closing the session, and then clicking the trash can icon on the classification card. How to handle the coding fields in Relativity® depends on whether your next predictive coding session will use the same definition of responsiveness as the last session.
If the same definition, you may want to retain the values of BDPC is Responsive field, and set the BDPC Use for Training to Yes for all documents BPDC is Responsive code. It is not possible to force the new session to use the same Control Set as the previous session. However, the coded Control Set documents may be used as training documents in the new session.
If the next predictive coding session will use a different definition of Responsiveness, you will want to delete the values of the BDPC is Responsive field. You will usually want to delete the values of the BDPC Use for Training field as well.
Dataset cleanup
As with other workflows, a TAR 1.0 workflow may benefit from first using Brainspace's analytics tools to remove groups of documents (e.g. bulk mail) that are clearly of no interest.
Steps to Predictive Coding -TAR 1.0
Add a New Classifier
After signing into Brainspace and selecting a Dataset, navigate to Classification in the primary navigation.
Click the New Classifierbutton in the sub-navigation menu which is highlighted in the example below to reveal the nextstep in the process.

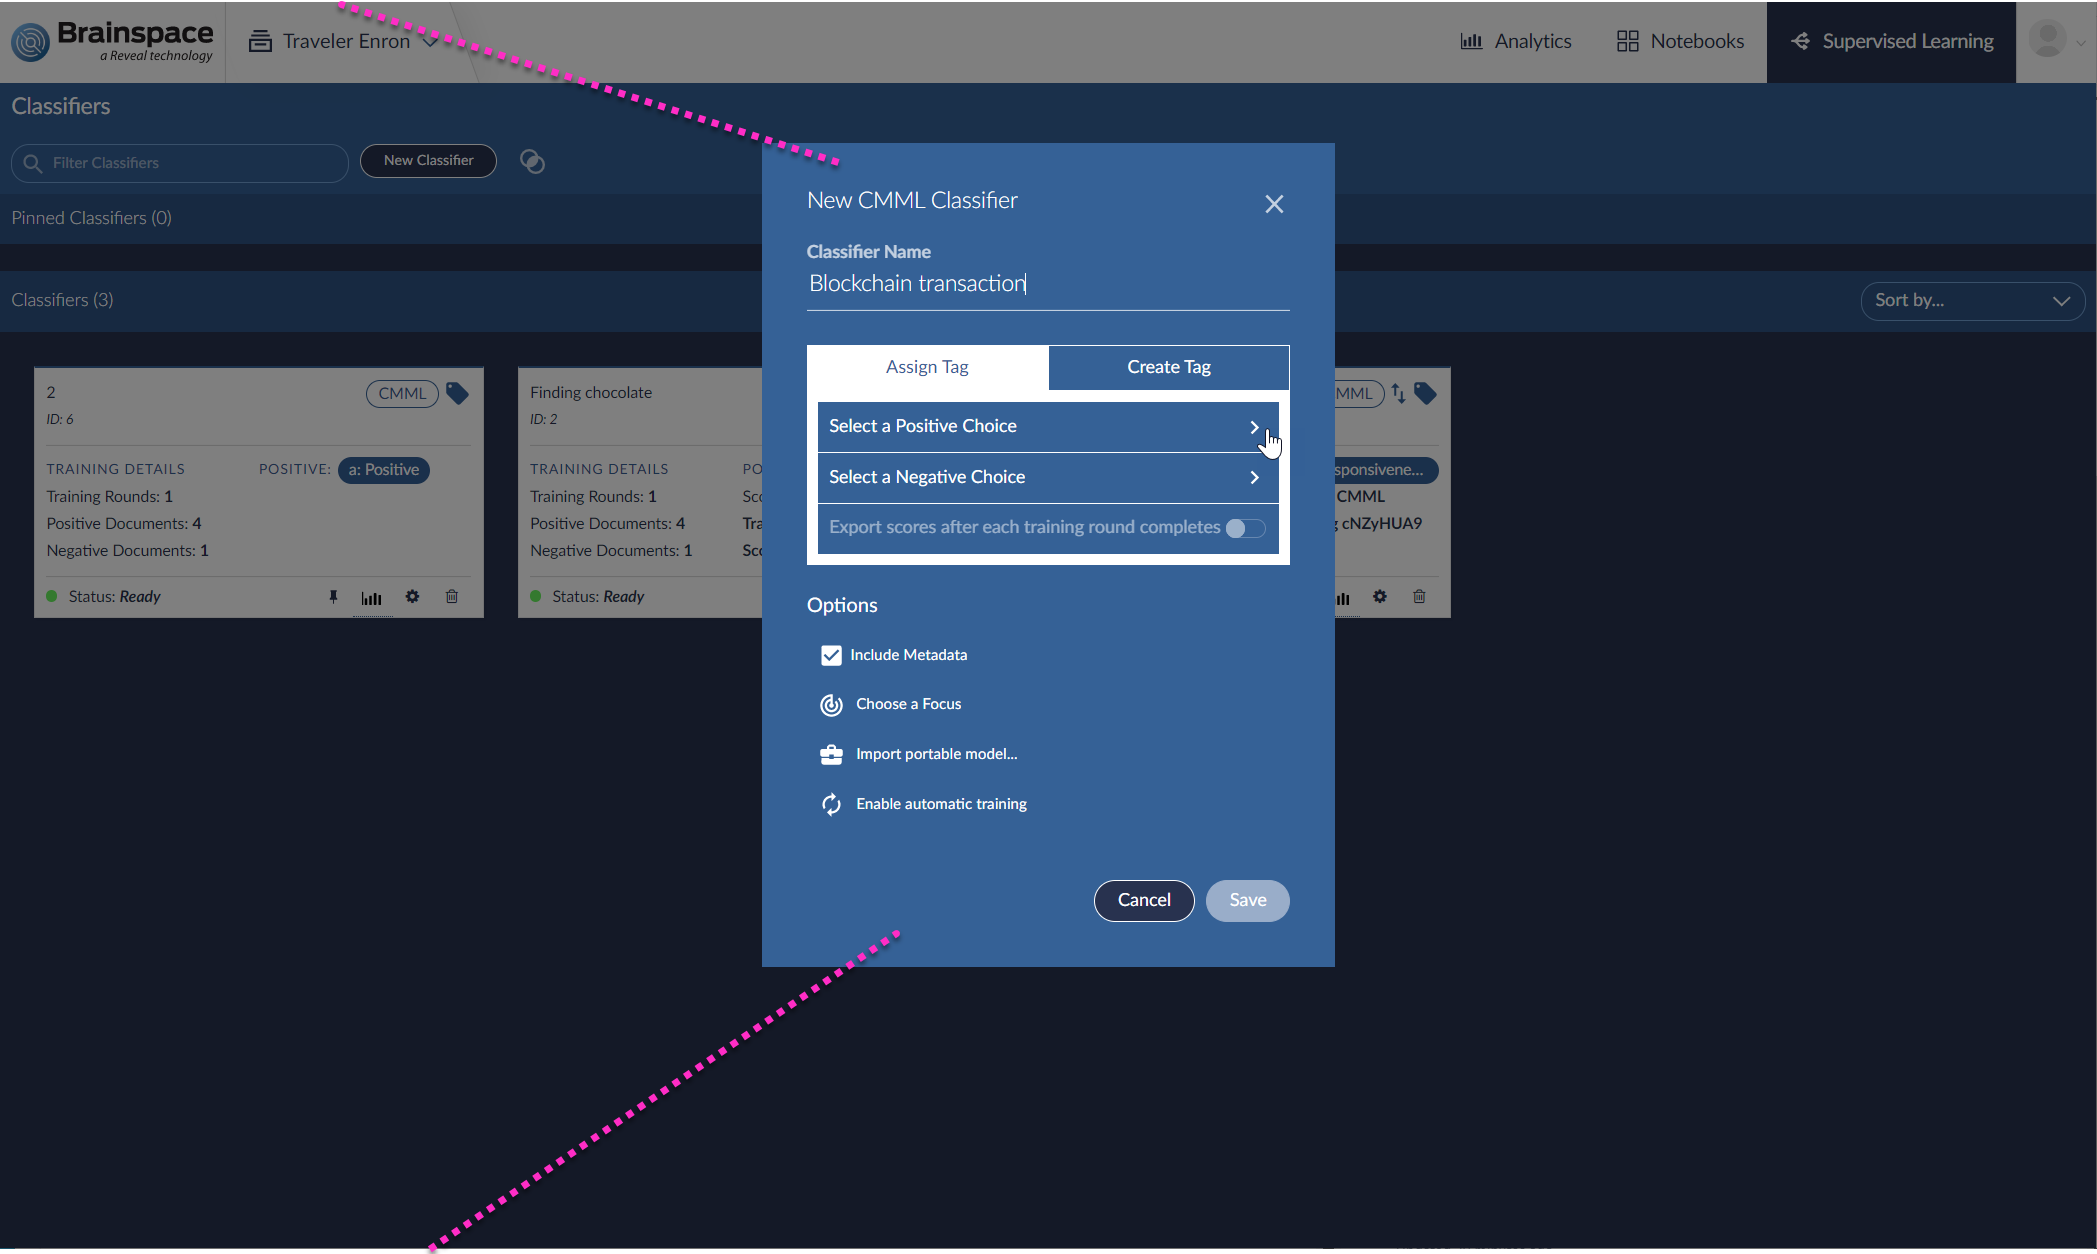
Creating a Classifier
A window will appear like the example below. Name your New Classifier by typing within the name text field.
SelectPredictive Coding as the workflow type in the pull down menu.
Click Next to proceed.
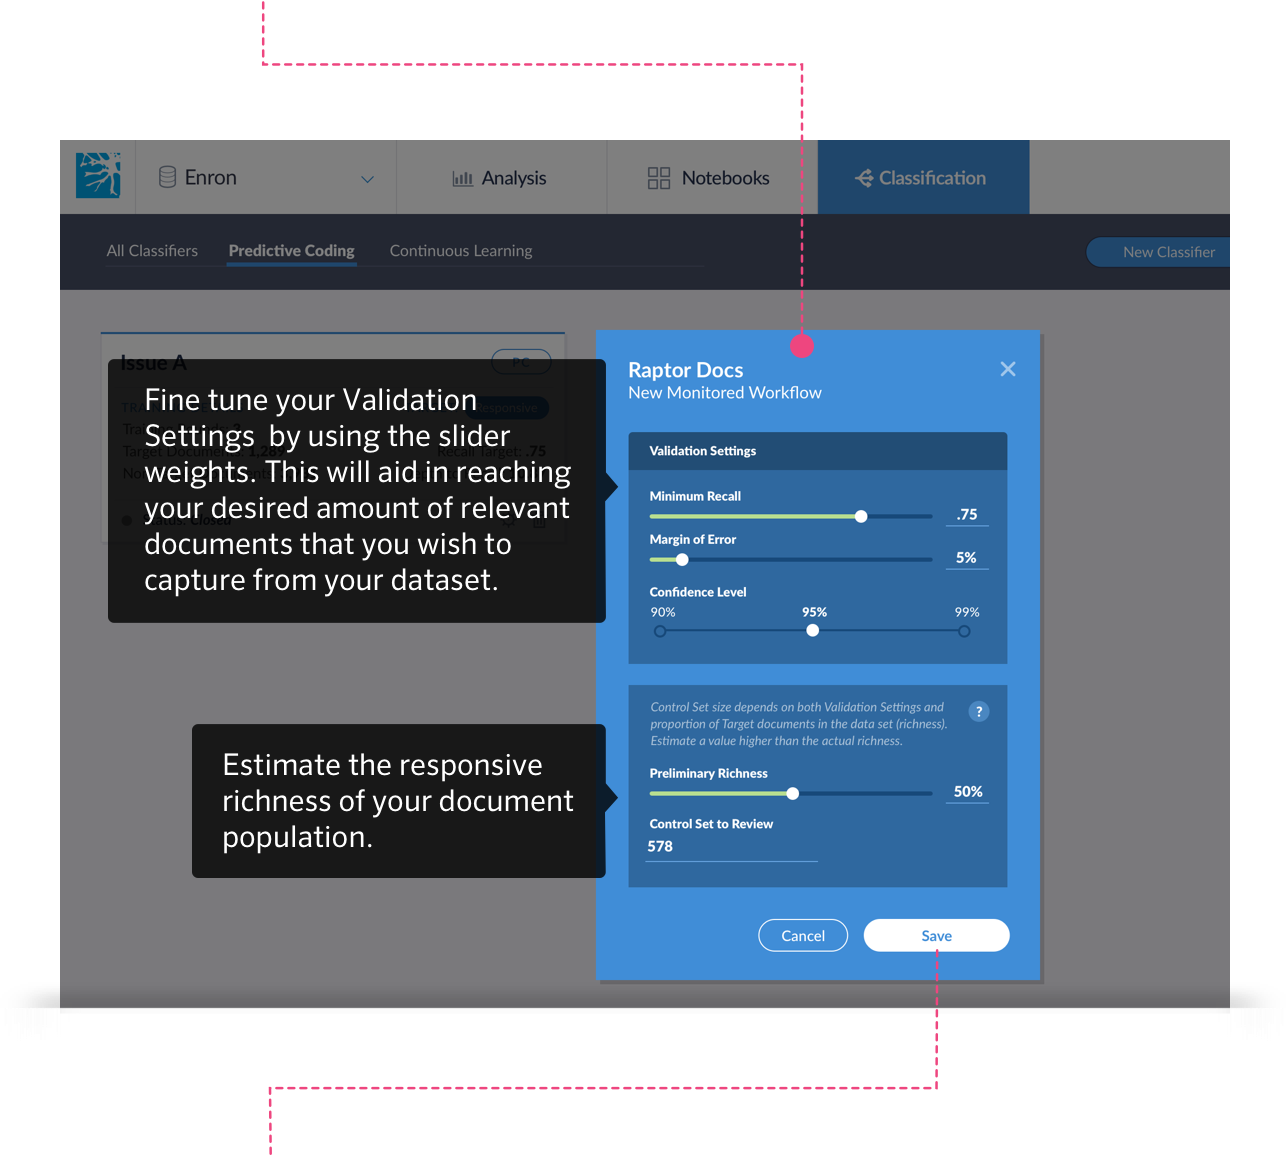
Adjust Your Validation Settings
First, decide what you would like your MinimumRecall, Margin of Error and Confidence Level values to be by using the sliders.
Next, estimate the responsive richness of your document population.
Click the Save button to start the Control Set review process.
Note
The Predictive Coding process starts within Brainspace by entering the statistical criteria of the Control Set which includes the Minimum Recall, Margin of Error and Confidence Level. It should be noted that drawing too few documents would produce a low recall confidence level, and would affect the accuracy of the model. Alternately, too many documents would waste the time and resources of the reviewers.
If you do not know the richness of your population then it is recommended to leave the PrimaryRichness defaulted to 50%. The Documents to Review will automatically update based on the PrimaryRichness you select.
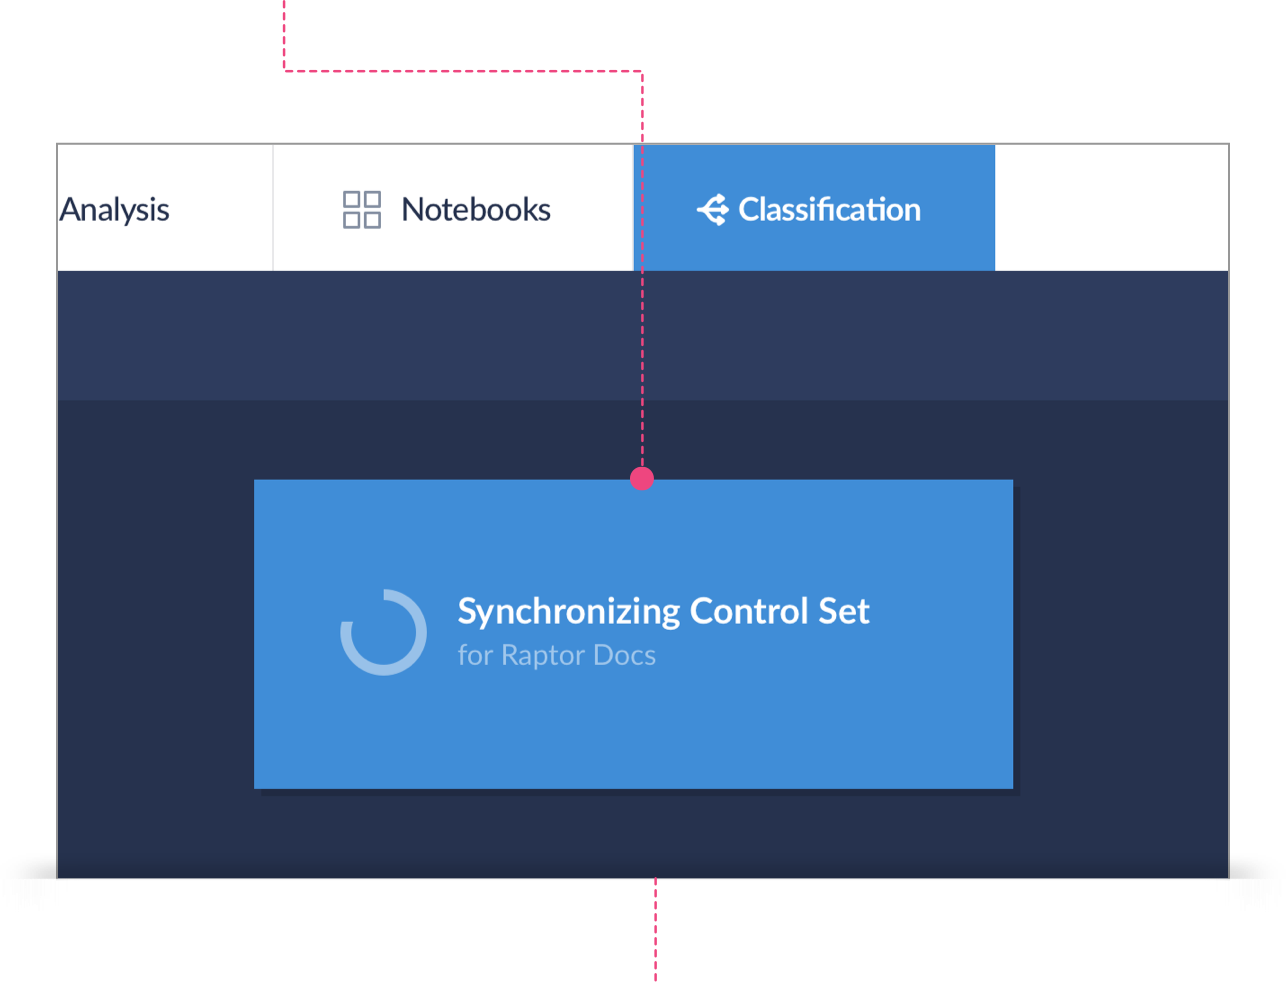
Syncing Your Control Set
Brainspace will then Sync (or tag) your Control Set documents within Relativity®. Brainspace will tag each document in the Control Set using the automatically created field in Relativity® called BDPC Needs Review. The BDPC Needs Review field will be set to Yes. Brainspace automatically creates a saved search called BDPC Docs Needing Review that identifies the Control Set document population that needs to be manually reviewed.
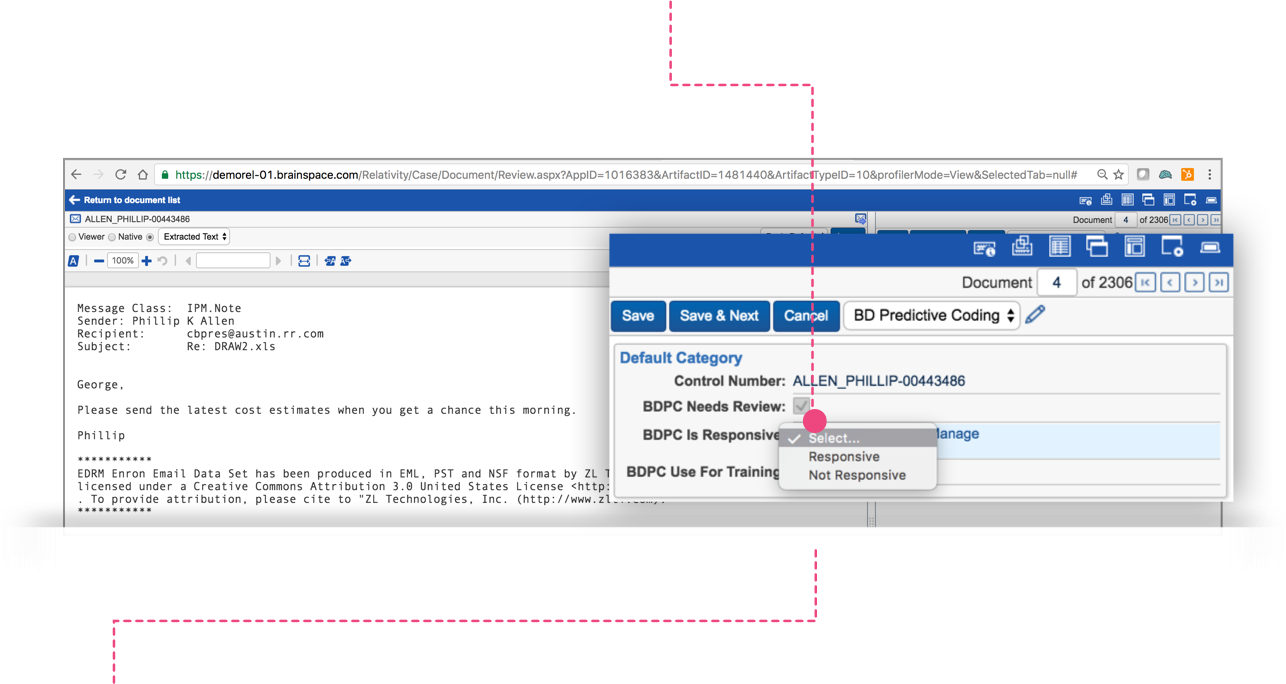
Now that the documents within your Control Set have been tagged in Relativity®, it’s time to have an attorney/reviewer that is knowledgeable about the case manually review the documents in Relativity®. The attorney/reviewer will code the documents as either Responsive or Non-Responsive using the BDPC Is Responsive field automatically created by Brainspace.
Run the Saved Search called BDPC Docs Needing Review and then using the BD Predictive Coding layout in Relativity® review and code each document in the saved search using the coding field called BDPC Is Responsive.
Review process
As the attorney/reviewer manually codes documents in Relativity® using the BDPC Is Responsive field, the Predictive Coding session in Brainspacewill automatically update the progress of the manual review (see screen shot below).
 |
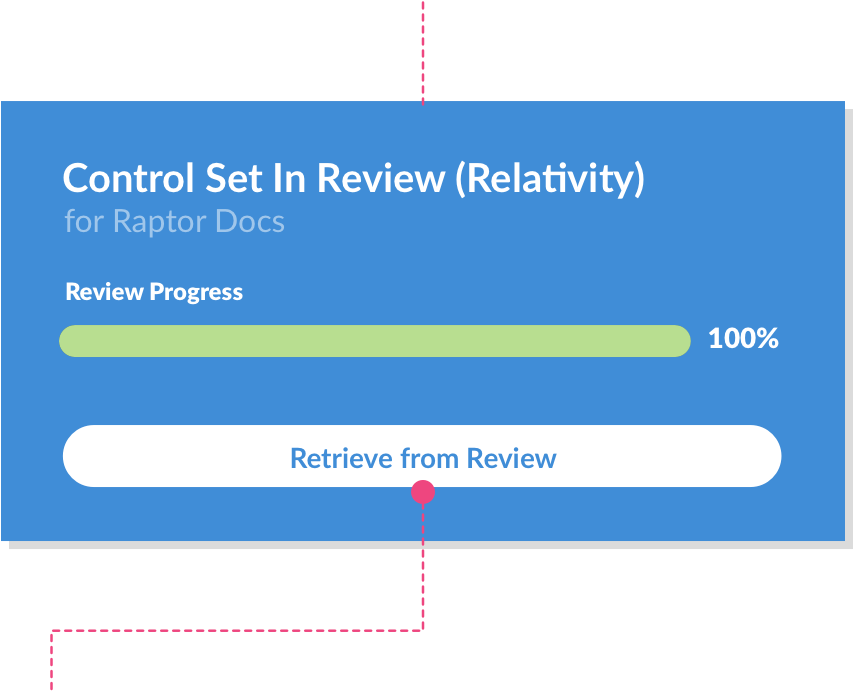
Once the attorney/reviewer has manually reviewed all of the Control Set docs in the BDPC Docs Needing Review saved search, the review progress indicator in Brainspace will go to 100% which means the Control Set review has been completed.
Click on Retrieve From Review. This will pull (sync) all of the manual coding decisions from the Control Set in Relativity® back into Brainspace for analysis.
Modify Your Control Set
After syncing, the model will determine if additional documents are needed to support the your target metrics. If additional documents are required, Brainspace will display an alert message within the Manage Control Set screen similar to the example below.
Click the Update and Add ## Docs button to add the additional recommended documents to the Control Set for manual review.

Login to Relativity® and run the BDPC Docs Needing Review saved search and have the identified attorney/reviewer manually review the additional documents using the BDPC Is Responsive coding field and BD Predictive Coding layout.
After the additional documents have been manually reviewed, login to Brainspace and click the Retrieve from Review button. This again will sync the manually coded documents in the Control Set back to Brainspace. Brainspace will again evaluate the Control Set and determine if any additional documents are needed to reach your target metrics.
Note
If additional documents are needed, repeat the steps in this section. If there is no warning message in Brainspace within the Modify Control Set screen that you can proceed with creating your Seed Set.

Create Seed and Training Sets
You are now ready to create the Seed Set and subsequent Training Sets which will teach the model how to identify responsive and non-responsive documents. There are two basic methods for creating the Seed Set and Training Sets. See below.
Automatic - Brainspace will automatically select documents for the Seed Set and Training Sets. Several options are available for the selection of the documents.
Manual - Brainspace can use a Notebook to create a Seed Set or Training Set. This method is common in situations where review has already started in Relativity® and documents have been coded either responsive or non-responsive. Brainspace can use these manually coded documents (not Control Set docs) to teach the model.
Create a Seed set - Automatic Method
Click on the Automatic button located in the Create a Seed Set column.
You have two choices available. Random and Influential. The Influential method is recommended to ensure the best representation of the document population. This method identifies documents that are most representative of all other documents within the population. These are typically the pivot documents.
Enter the number of documents to be included in the Seed Set. It is recommended that you start with 200 documents.
Click Create Seed Set and Brainspace will begin the first training round of the Predictive Coding session.

Evaluate the Predictive Coding Results
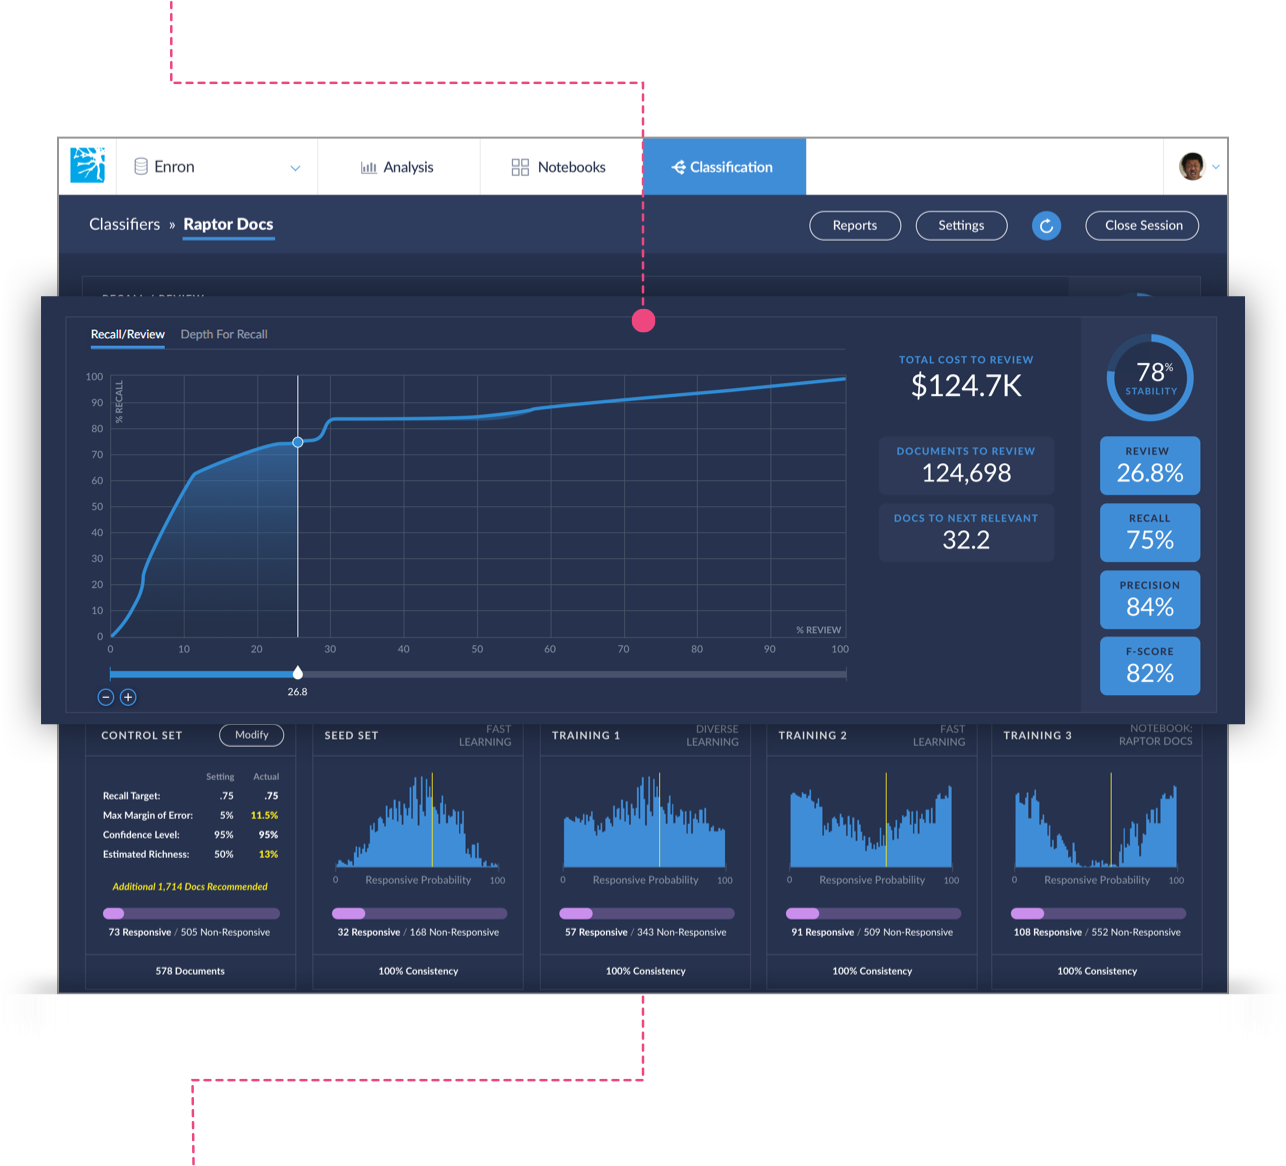
There are two options to view your results, Recall/Review and Depth for Recall. After each Training Batch (training round) these graphs will be automatically updated to include the additional Training Batch coding information. As the model improves, the data will appear to plateau as the Depth For Recall decreases, and the Recall, F-score, and Precision increases. Below is a summary of both graphs.
Recall/Review
The Recall/Review graph shows a value of interest (labeled% REVIEW in the chart ) for a single predictive model at several different values of the goal recall (labeled % RECALL in the chart).
The Recall/Review graph allows you to play with different cutoff values without changing your goal recall by using the slider located directly below the graph. As you adjust the slider, the corresponding recall % and all other effectiveness statistics and counts will alter accordingly.
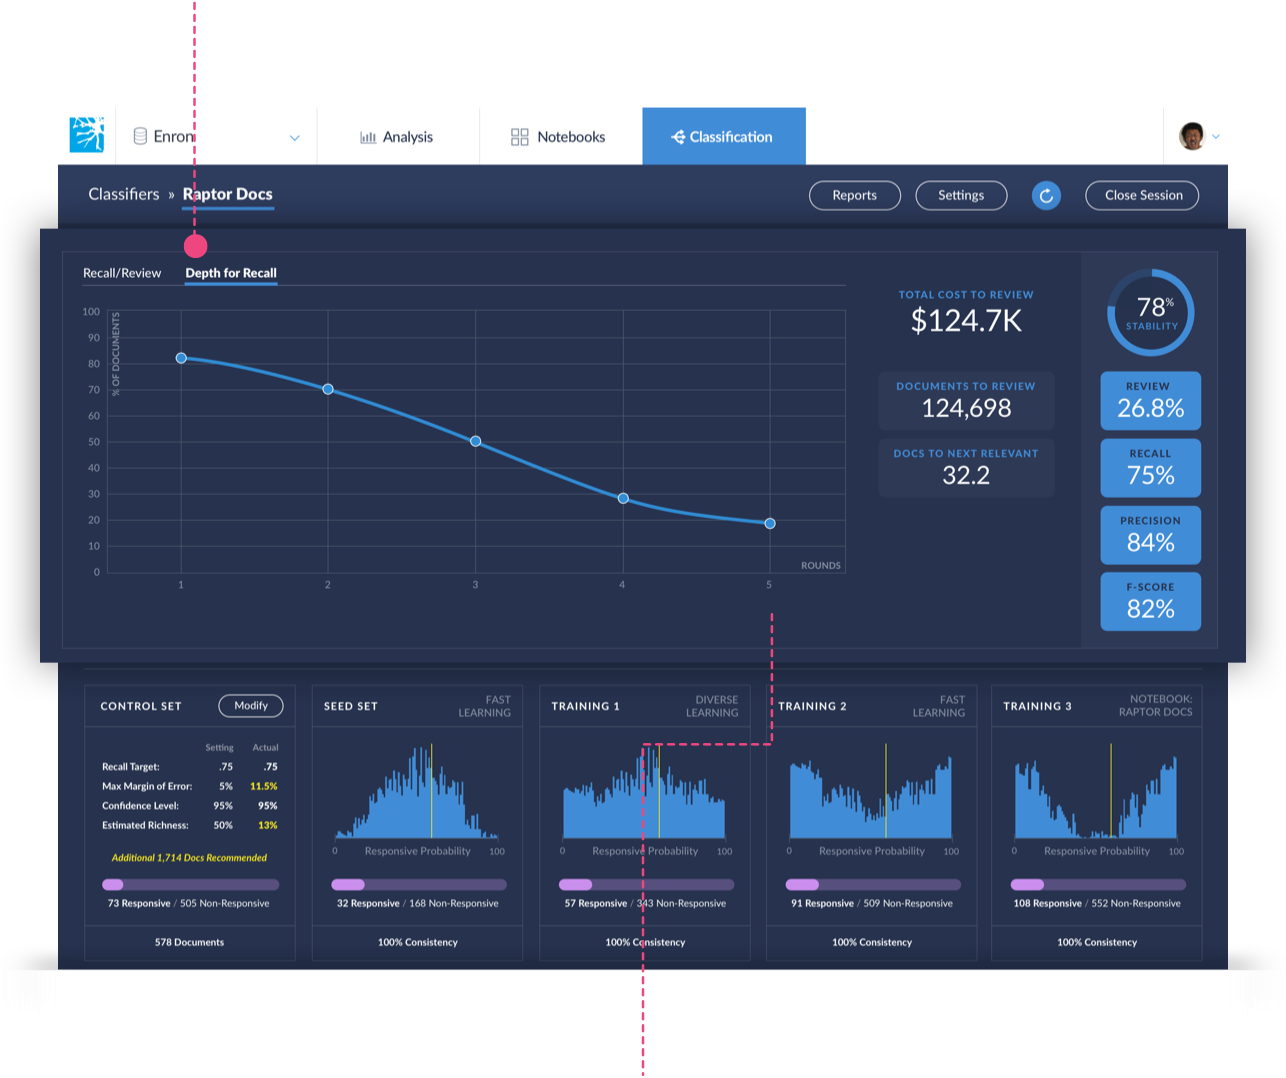
Depth for Recall
This graph view shows change in effectiveness statistics to help the review manager understand how training is progressing.
When evaluating predictive coding results, the Depth for Recall graph will automatically update to include the additional Training Set coding information. As the model improves, the data will appear to plateau as the Depth For Recall decreases, and the Recall, F-score, and Precision increases.
Toggle to view the Depth for Recall graph
Note
When the Depth for Recall plateaus then it means that manually reviewing additional documents will not improve the model. Basically, at this point, your model is optimized and you ready to close the Predictive Coding session and apply the auto coding back into Relativity®.

Close Your Coding Session
To close the Predictive Coding Session, click the Close Session button located in the upper right-hand side of the Predictive Coding Session screen.
A screen will appear with the number of documents that will be coded based on the target recall similar to the one below. Select the box if you would like to include Families in the coding session.
Click Yes, Code Documents to proceed.

After Brainspace has applied the auto coding to all the documents the following screen will appear giving you a message that the session is closed and can no longer be modified.
Click Re-Open to the right of the message to open the session.
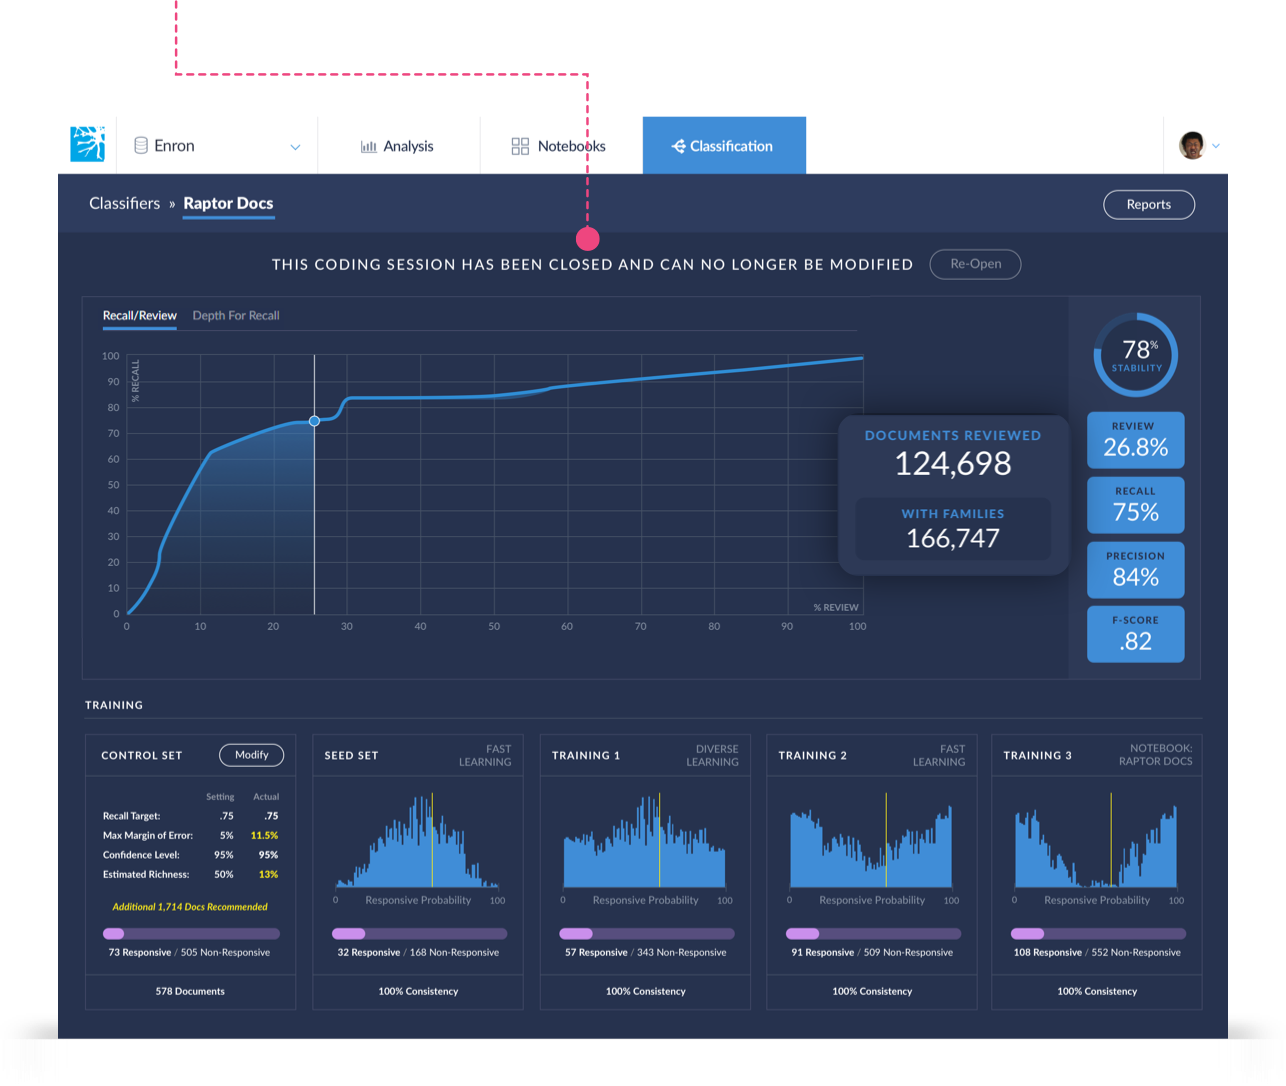
Note
The number of documents reviewed will appear on the right hand side of the screen, similar to the highlighted example above. If you selected Families to be included in the coding session, that count will appear as well.