Notebooks
After searching for documents in a dataset, you can add the documents to an existing notebook or create a new notebook for the documents. These collections are very useful in organizing analyzed documents to be synchronized with review applications.
Notebooks Screen
You can create a Brainspace notebook to collect documents for a specific subject or for search results. You can also make notebooks public or private, include existing tags, and include trained classifiers in a notebook. Notebooks are not shared across datasets, but public notebooks are shared to all users of the dataset.
Note
When creating a new notebook, an option is provided to add documents to a notebook from a list of document IDs included in a *.csv file.
After opening a dataset in Brainspace, you can open the Notebooks screen from any screen in Brainspace. The Notebooks screen includes the following features:
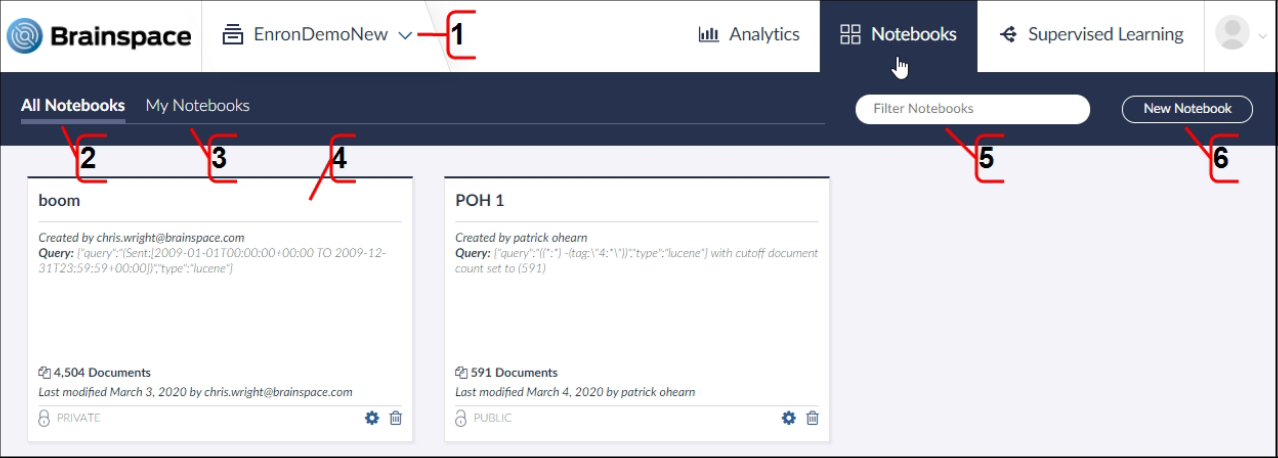
View the current dataset name or click the dropdown menu to open a different dataset.
View all private and public notebooks in the dataset. All Brainspace users can view and modify the contents of public notebooks in a dataset. Private notebooks can only be viewed and managed by the notebook creator and by Admins. Although you can change a private notebook to a public notebook at any time, you cannot change a public notebook to a private notebook.
View all public and private notebooks created by the current Brainspace user. All Brainspace users can view and modify the contents of public notebooks in a dataset. Private notebooks can only be viewed and managed by the notebook creator and by Admins. Although you can change a private notebook to a public notebook at any time, you cannot change a public notebook to a private notebook.
Click a notebook card to manage its settings and documents.
Search for a notebook name in the dataset.
Create a new notebook.
Notebook Card Information
After you create a notebook, Brainspace adds a notebook card to the Notebooks screen. A notebook card includes the following features:
 |
View the notebook name.
View the notebook creator, description, and Lucene query information. The Lucene query information is generated automatically in some cases and will be removed if any documents are added to or removed from the notebook.
View the number of documents in the notebook and the date it was last modified.
View the notebook’s status as PUBLIC or PRIVATE. All Brainspace users can view and modify the contents of public notebooks in a dataset. Private notebooks can only be viewed and managed by the notebook creator and by Admins. Although you can change a private notebook to a public notebook at any time, you cannot change a public notebook to a private notebook.
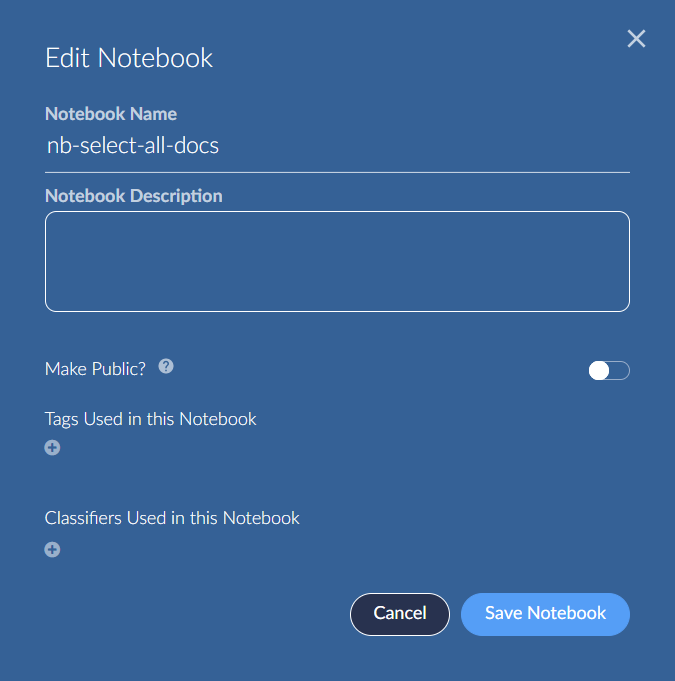
Edit the notebook’s Settings. You may edit the Notebook's name and description, make a private Notebook public, and add Tags and Classifiers used in the Notebook selection in a version of the Create New Notebook dialog screen below.
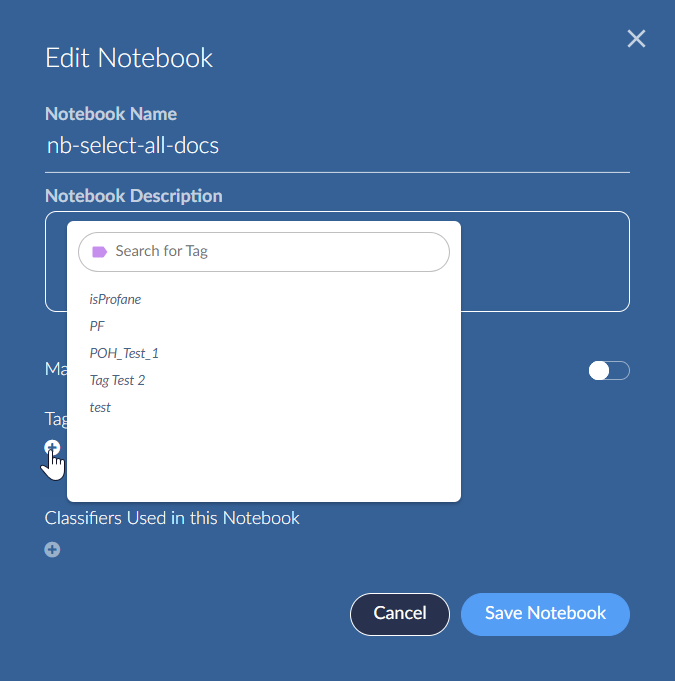

Adding Tags and Classifiers Used to Notebook settings.

The Tag and Classifier 'pills' may be removed by clicking an 'X' that appears the right of each when the pointer hovers over. Save Notebook to update.
Delete the notebook from Brainspace. This will remove the notebook from the dataset, but the documents will remain in the dataset.
Create a New Notebook Dialog
After opening the Notebooks screen and clicking the New Notebook button, the Create a New Notebook dialog will open. The Create New Notebook dialog includes the following features:
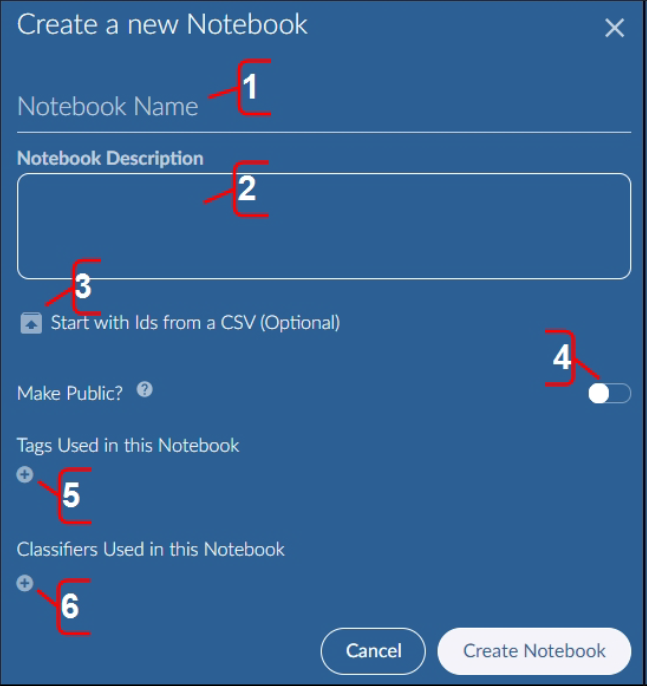 |
Enter the notebook name.
Describe the purpose of and any additional important details about the notebook.
You have the option to upload IDs from a *.csv file to add specific documents to the notebook. Notebooks may otherwise be created or added to using a search or a Focus.
Change notebook status from private (default) to public to make the notebook generally accessible. All Brainspace users can view and modify the contents of public notebooks in a dataset. Private notebooks can only be viewed and managed by the notebook creator and by Admins. Although you can change a private notebook to a public notebook at any time, you cannot change a public notebook to a private notebook.
Optionally select existing dataset tags to be highlighted in the notebook.
Optionally select existing classifiers to sort the documents in the notebook.
Create Notebook to complete the process.
After creating the notebook, you can add documents to the notebook while using any of the Analytics features in Brainspace and after creating new classifiers. You can edit the notebook setting at any time, and you can remove documents from the notebook in the Notebook dialog.
View Documents in a Notebook
After creating a notebook, you can open it to view and manage its documents.
To view documents in a notebook:
Open a dataset in the Analytics Dashboard.
Click the Notebooks tab.

The All Notebooks screen will open by default.
Click a Notebook card.
The notebook’s documents will display in the card viewer with the Overview chart displaying the number of documents included over a given period of time.
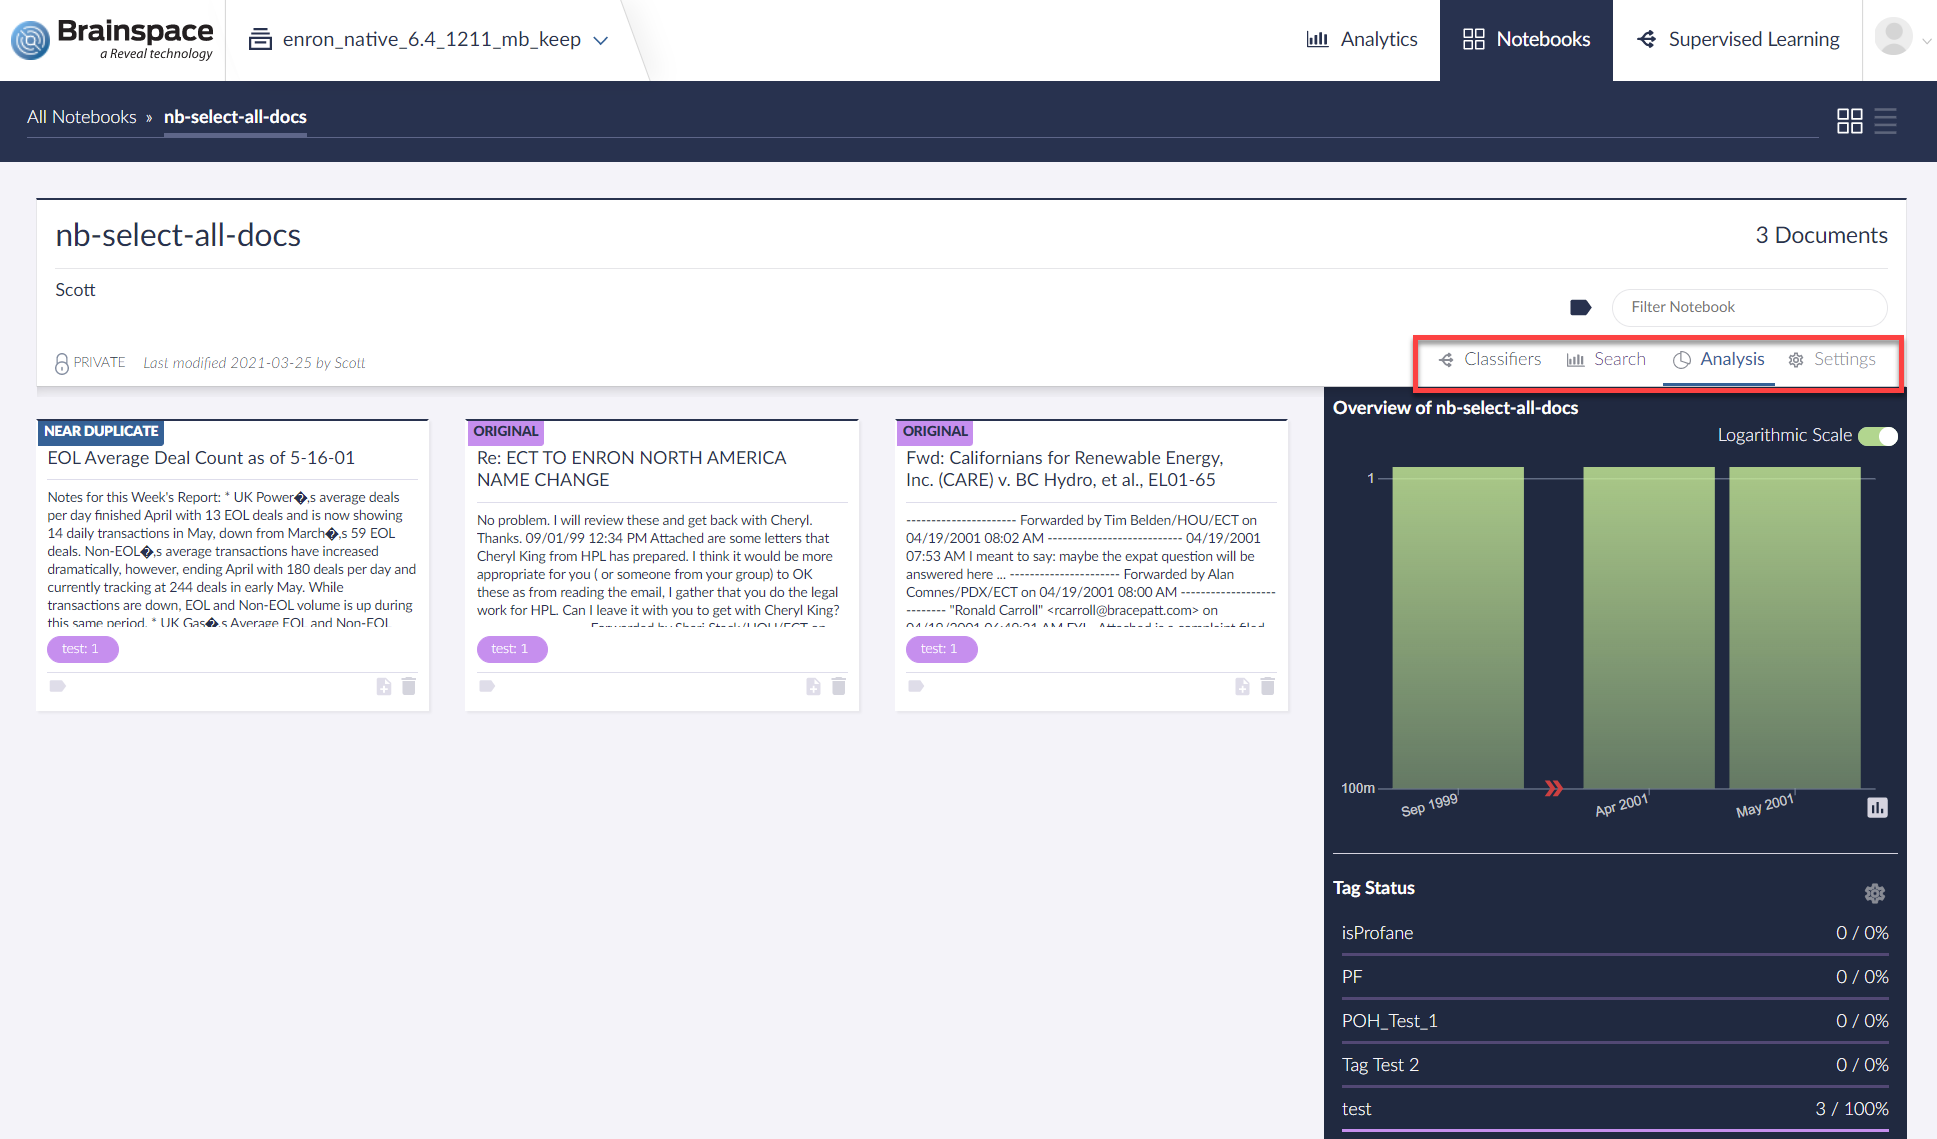
After opening the notebook to view its documents, you can use the highlighted Notebook menu items to:
use any selected Classifier to sort the documents in the notebook,
open the Search to modify the Notebook's retrieval parameters,
open the Analysis pane to examine the timeline and status of any tags selected for display, and
update the Notebook Settings.
Within the individual document cards in the Notebook are several view and setting options as well:
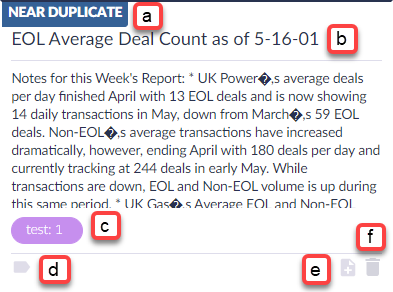 |
View the status of the document as an Original, Near Duplicate or Exact Duplicate.
View the title and opening text of the document, with the option to open the Document Viewer.
View or remove the document's current Tag(s).
Select additional tag(s) to be associated with the document.
Include Threads, Families, Related Documents and/or Exact Duplicates.
Remove document; a warning will appear before the document is confirmed to be removed.
View Notebook List View
After creating a notebook, you can view its documents and sort them by specific fields, including metadata such as sent date.
Note
The date fields format displayed depends on the date format in the original data.
To view notebook cards in the list view:
Open a dataset in the Analytics Dashboard.
Click the Notebooks tab.
The All Notebooks screen will open by default.
Click a Notebook card.
The notebook’s documents will display in the card view.
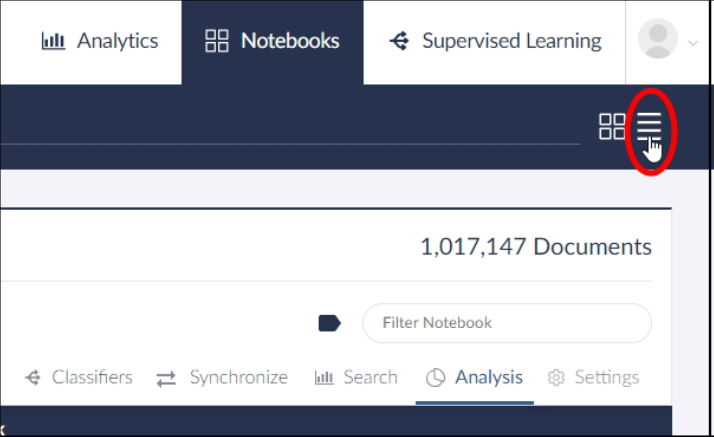
Click the List View icon.
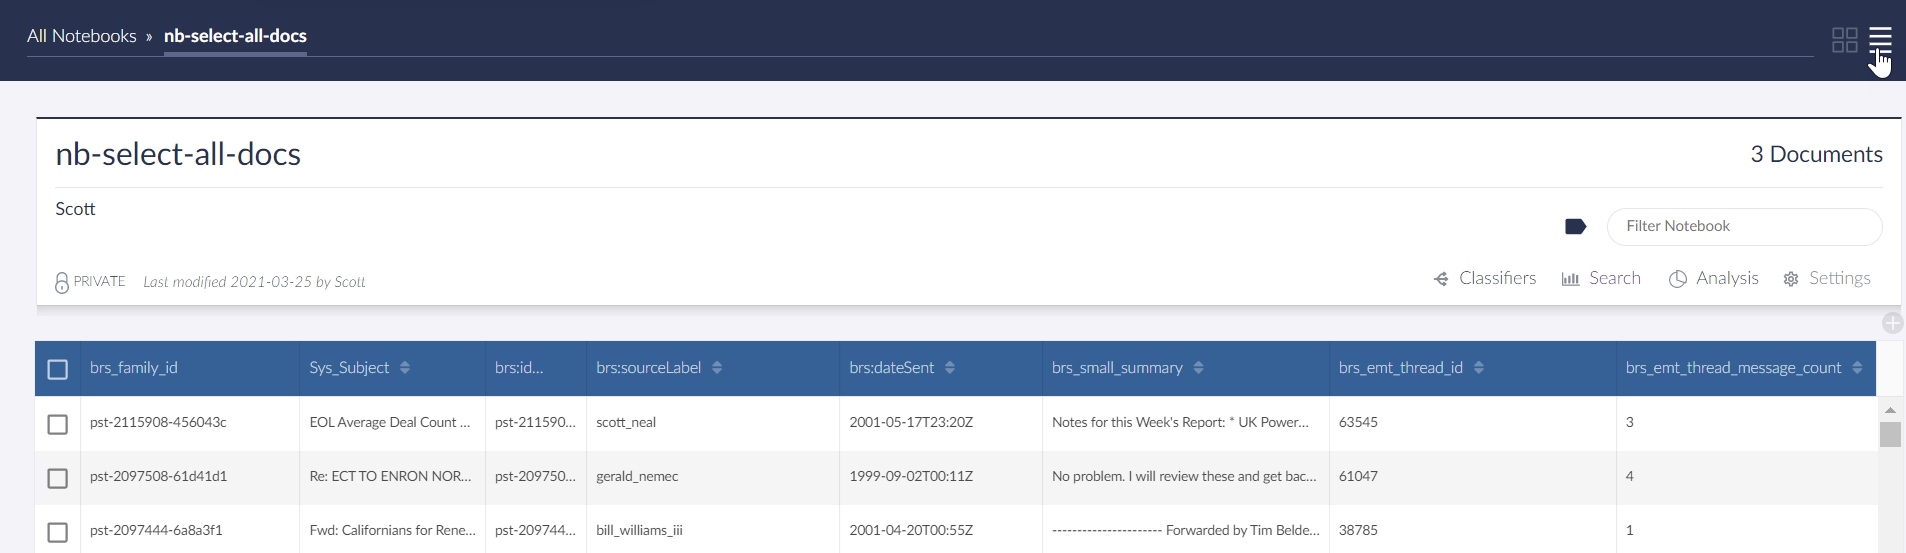
You can change the order of the metadata fields displayed, change the column sizes, add metadata fields to or remove metadata fields from the display, and sort by any metadata field. These changes are not preserved when you exit the list view.