Brainspace Archiving
Note
In Reveal SaaS Hosted environments, Brainspace archiving can only be done by Reveal support personnel, and requires a support request to support@revealdata.com.
Determine which elements of work product need to be preserved for each Brainspace dataset. Then follow the subsequent instructions for each element. Each of the instructions below assumes the user has sufficient Admin privileges. (For example, to export ALL Saved Searches requires at least Group Admin.)
Saved Searches
Tags
Notebooks
Focuses
Dataset Reports
Connectors
Classifiers
Control Sets
Training Rounds
Reports
Visuals
Portable Models
Saved Searches:
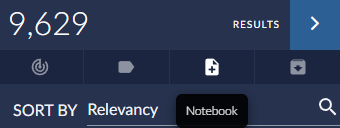
On the Analytics dashboard, click the Saved Searches icon:
 . The Saved Searches drop-down list will display Your Saved Searches and a tab for Other Searches. Click Export Saved Searches for both tabs:
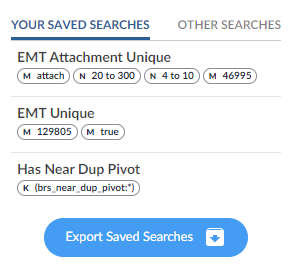
Confirm both downloads. They should be a *.txt file that contains something like the following:
search name,query,focus,classifier name,created date,user name
"EMT Unique","(brs_emt_thread_id:"129805") AND brs_emt_unique:"true")" , "","","2022-05-05T13:28:27+0000","Chris Wright"
Tags:
For information about tags, please see https://brainspace-help.revealdata.com/en/Tags.html
Tags shared with Reveal Review should be PUSHED to Reveal Review to save their most current state.
Tags held only within Brainspace (not Connect Tags) that need to be saved should have a NEW tag created in Reveal Review, searches on Tag values run in Brainspace to tag documents with the new Tag, then that new tag should be PUSHED to Reveal Review. This is illustrated by the following steps:
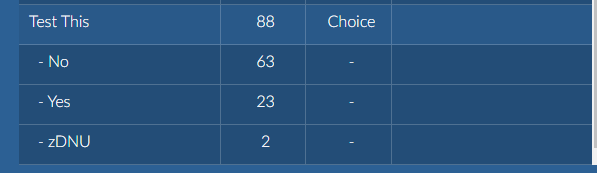
Find the non-Connect Tag in Tag management (e.g., Test This in the illustration below):
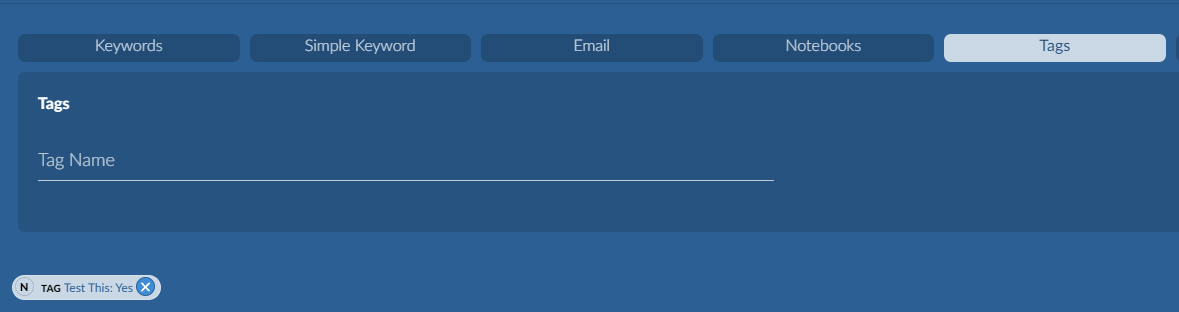
Create that tag (with a slight name change to keep it clear) under Tags in Project Admin of Reveal Review:

In Brainspace, use Tag management to Connect the new tag:

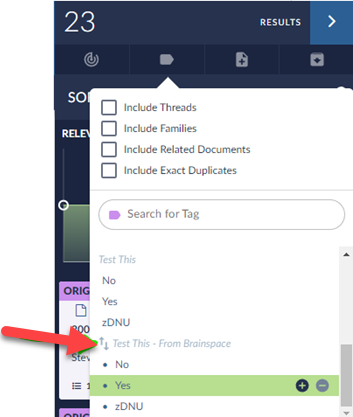
In the Analytics panel for the dataset, run an Advanced Search for the old tag and one value.
Use the mass tag button to apply the new tag to these documents. NOTE the new tag should have the “connect tag” indicator
 :
:
Repeat steps 6-7 for all values of the tag.
When complete, PUSH the tag from Tag management.
Notebooks:
Each notebook that needs to be preserved should be synced to a Work Folder (or alternately, a tag) in Reveal Review.
For information about Notebooks, see https://brainspace-help.revealdata.com/en/Notebooks.html.
Select a Notebook from the list of all notebooks.

Select Synchronize for this notebook.

Provide credentials for Reveal Review, if prompted, and select Work Folders, then Push the Notebook.
Visit Reveal Review to confirm new Work Folder has been created and populated.
Repeat for all Notebooks that need to be saved.
Focuses:
For information on Focuses, see https://brainspace-help.revealdata.com/en/Document-Viewer.html#Create-a-Focus.
The Cluster Wheel for a focus cannot be retained, but if a Focus needs to be saved, then saving the document list used to generate it is useful.
Use an Advanced Search for metadata, “Focus” to search for the Focus to be saved.


Save the Search Results to a new Notebook:
Synchronize the new Notebook to Reveal Review (see previous section for instructions).
Dataset Reports:
Dataset reports will be regenerated if there’s a future dataset build. However, some of them may have meaningful information that you may want to preserve. For more information on the dataset reports, please see https://brainspace-help.revealdata.com/en/Brainspace-Reports.html#idm46105274724480
Under Administration > Datasets click to Download the reports for the dataset. Some reports to consider:
Batch Tools Version Report (build history)
Full Report (which may have been overlaid to Reveal Review)
Person Report (Communications nodes, including manually aggregated persons)
Schema.xml (preserve field mapping)
Connectors:
Connectors are used to point Brainspace to external data sources and contain potentially useful information about how the dataset was built. For more information on connectors, please see https://brainspace-help.revealdata.com/en/Connectors.html.
Under the Administration > Connectors tab Download the connector report.

Screenshot capture the Dataset to preserve which Connector was used for the build.

Classifiers:
CMML Classifiers have a variety of work product and require separate actions to preserve. For more information on CMML, see https://brainspace-help.revealdata.com/en/Continuous-Multimodal-Learning.html.
Classifiers – Portable Models:
To save only the deliberately reusable elements of a classifier, download the Portable Model, which can then be imported into another dataset. For more information, see https://brainspace-help.revealdata.com/en/Portable-Models.html#idm46105270470576.
Click a Classifier card.
In the Training pane, click the Portable Model Actions icon:
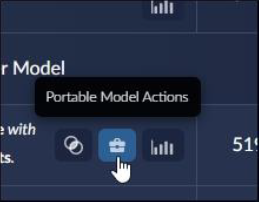
Click the Download button.
Classifiers – Reports:
Classifier reports may contain useful information for providing historical context and can be easily downloaded.
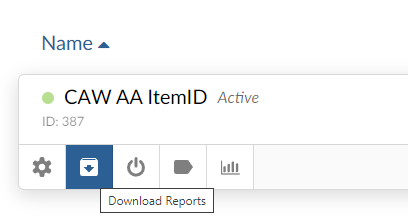
Click a Classifier card.
In the Training pane, click the Download Reports icon for the most recent training round.

Classifiers – Visuals:
If the history of training is needed, use a screenshot tool to capture the visual information.
 |
Classifiers – Training Rounds:
If it is desirable to recreate the classifier’s history, this can be done if the documents list for each training round is preserved.
Click a Classifier card.
In the Training pane, visit the first training round and select the View in Analytics icon:

This will load the Analytics Dashboard with the documents from that Training Round as Search Results. Use the Notebook button to drop these into a new notebook with a useful naming convention.
Synchronize the Notebook to Reveal Review as a Work Folder. (See Notebooks in previous section if needed.)
Repeat steps 2-4 for all training rounds.
Ensure Tagging is preserved as well. (See Tags in previous section if needed.)
Classifiers – Control Sets:
A newly created Classifier will create a randomly chosen Control Set, so these can’t be reused. Still, it may be useful to capture the previous one.
Click a Classifier card.
If a Control Set was created, select the Training Statistics Tab, and then press the View Control Set Documents in Analytics icon:

This will load the Analytics Dashboard with the documents from the Control Set as Search Results. Use the Notebook button to drop these into a new notebook with a useful naming convention.
Sync the Notebook to Reveal Review as a Work Folder. (See Notebooks in previous section if needed.)
Ensure Tagging is preserved as well. (See Tags in previous section if needed.)