Supervised Learning
Supervised learning is a form of machine learning where a human expert tags documents as being positive or negative examples of some category of interest. These tagged documents, the training set, are used by a computer algorithm to produce a predictive model. The predictive model can then be used to assign scores to documents such that members of the category (positive documents) will tend to have high scores, and non-members (negative documents) will tend to have low scores.
These scores can be used both to sort documents by score (so that the ones most likely to the positive can be examined first), and to classify documents by comparing their score to a cutoff score. When scores are used in the latter way, the predictive model is sometimes called a classifier.
In Brainspace, a predictive model actually assigns two scores to a document. One (the raw score) can be any positive or negative number. The other (the probability score) is always between 0 and 1. For most purposes, the probability score is most useful. In particular, with sufficient training, the probability score is an approximation of the probability that the document is a member of the positive class. The main use of the raw score is in sorting documents, since two documents that have a probability score of 1.0 may have different raw scores.
The process of training a predictive model is typically done incrementally rather than all at once. A small to moderate sized training batch of documents is tagged, a predictive model is trained, and then a user decides (using various information) whether more training is necessary. If so, another training batch is selected, and the process continues. Each repetition of this process is called a training round.
Features
Predictive models score documents based on their features: elements of a document such as terms, phrases, and, optionally, metadata characteristics. When a document is tagged positive and added to the training set, the weights (coefficients) associated with that document’s features in the predictive model resulting increase. When a training set document is tagged negative, the coefficients of that document’s features in the predictive model decrease. The resulting predictive model tends to give high scores to unreviewed positive documents and low scores to unreviewed negative documents.
When an unreviewed document is evaluated, the cumulative score of each feature is used to determine its likely relevance.
Example text phrase feature: “tangible personal property”
Example metadata feature: ["email sent date-hour-of-day","00"]
Portable Model
A predictive model is a model that is saved for the purposes of reusing the model for another case.
Precision
The total number of relevant documents compared to the number of all the documents that were selected and analyzed by the training model.
Responsive
In legal document review, a document is considered to be responsive when the information it contains is responsive (likely relevant) to a discovery request by the opposition.
For example, when opposing counsel requests all documents related to comedy, a document is responsive if it is mostly about comedy. This can be an article about a comedy show, comedy book, comedy TV show, or a comedian.
Non-responsive
In legal document review, a document is considered to be non-responsive when the information it contains is not responsive (likely not relevant) to a discovery request by the opposition.
For example, when opposing counsel requests all documents related to comedy, a document is nonresponsive if it is not mostly about comedy. In other words, a document about a person is nonresponsive if that person is not a comedian and has not taken comic roles.
Seed Set (Seed Round)
Also called a seed round, the first training round of documents tagged by human reviewers for a Predictive Coding or Continuous Multimodal Learning session used to teach a classifier how to distinguish between responsive and non-responsive documents.
Target Population
The full set of documents within a document corpus that are being sought (i.e., the theoretically complete set of responsive documents).
Control Set
A control set is a random sample of documents in a dataset that can be used to measure the classifier. When creating a control set, the validation settings for Minimum Recall, Margin of Error and Confidence Level are selected by the user. After a randomly selected sample has been fully reviewed, you can use it to estimate richness, recall, precision, and depth for recall. These estimates depend on the size of the control set and the values of the validation settings chosen.
Creating control sets can be confusing because of the “chicken-and-the-egg” problem of needing a control set to decide how big of a control set you need.
Brainspace draws the first control set to get an initial estimate of richness and if that insufficiently large, Brainspace will guide the user into adding documents to the control set until a sufficient number of responsive documents are tagged. Brainspace can estimate the richness of your document set and use that value to estimate how many documents need to be added to the control set for your desired level of recall, certainty, and margin of error. Keep in mind that this is an estimate. After more documents have been randomly selected, the richness estimate will have improved, and the number of documents you need in your control set might increase. It can take a few rounds of adding more randomly selected documents until you finally have enough documents.
In low-richness document sets, you may have to review a large number of documents to find enough responsive documents for your control set.
Control Sets and Rolling Productions
Many e-discovery projects have rolling productions. While you might begin predictive coding when you have 100,000 documents, in the end you might have 1,000,000 documents because of rolling productions. It’s important for the final control set used to evaluate the model to be valid.
Your control set is valid if you cannot differentiate how you selected your control set from randomly selecting a QA set at the end of your predictive coding process. Randomly selecting a QA set at the end of your predictive coding process means that all rolling productions have happened. The full candidate set of documents is now known, and you pick a random set of documents out of that full set.
Note
Brainspace does not support clawbacks.
For rolling productions, this means the initial control set may no longer be valid.
Let ’s say that when you started with 100,000 documents you picked a random control set containing 1,000 documents. Now, because you received additional documents along the way, you have a document set with 1,000,000 documents. If you picked a control set with 1,000 documents out of a set of 1,000,000, odds are that you picked a control set that only has documents from the first 100,000 documents.
Each time you randomly pick a document, there is a 1:10 chance that the document came from the first 100,000 documents. When you pick the second document, there is only a 1:100 chance that both documents were in the first 100,000 (1/10 * 1/10 = 1/100). By the time you have picked nine documents randomly, there is only a 1:1,000,000,000 chance that all nine documents were found in the first 100,000 documents. By the time you pick document 1,000, odds are that all of those documents came from the first 100,000 documents.
Let’s say that you started with 100,000 documents and, at the end of your rolling productions, you have 200,000 documents. Now for each document selected there is a 1:2 chance that it was picked from the first 100,000 documents. In this case, by the time you randomly pick document 30, there is less than a 1:1,000,000,000 chance that all 30 documents came from the first 100,000 documents.
In other words, as soon as you have a rolling production, your existing control set is biased and can no longer be used for making predictions about richness, recall, precision, or anything else about your dataset.
Repairing and Replacing a Control Set
Adding more documents to your document population after you have drawn your control set breaks control-set validity. If you add more documents to a control set after drawing a control set, you can either repair or replace the control set.
The biggest difference between repairing and replacing is the total number of documents that must be reviewed for the control set, and the total cost of reviewing those documents.
One other difference is that if you repair, you can choose to repair your control set after each rolling production. This means you always have an up to date view of the richness of your document population and you always have a control set that can accurately estimate recall and precision for your entire document population.
If each rolling production is the same size as the original production of documents, then you will have to replace your control set less frequently than you receive rolling productions if you want to save on the total number of documents reviewed for the control set. If you don’t generate a new control set each time there is a rolling production, then for some amount of time you will be working with a control set that does not accurately estimate the richness or your document set and can’t accurately predict the recall and precision of a classifier’s performance on that document set.
In practice, you will usually decide how to handle rolling productions based on how much you expect your document population to grow. If you expect the document population to significantly more than double in size, then replacing the control set one or more times will probably cost less than repairing the control set each time.
If you do not know how much your document population will grow, then we recommend you do simply replace the control set each time the document population doubles. This way you keep your control set from getting too far out of sync with your document population to be useful while at the same time avoiding an unacceptable increase in review costs.
Repair a Control Set by Same-Rate Sampling
To repair the control set, we need to pick additional control set documents in a way that, if we were picking a completely new control set now, would be likely to have as many documents coming from the first 20 documents as the current control set has selected from the first 20 documents.
Replace a Control Set
In a case where the document population will more than double, you are usually better off replacing the control set. Since the certainty and margin of error of a control set depends more on the number of positive examples in the control set, you can review fewer documents by replacing the control set with a similarly sized control set selected over the entire final population.
Rolling productions can add document sets with different richnesses than the original set. Just selecting a control set that is the same size as the one it is replacing does not guarantee that the resulting set will have the same number of responsive documents and the same statistical properties as the original control set. In the real world the control sets are larger and the results won’t vary as much unless the richness of the document population was significantly changed by the rolling productions.
Control Sets and Training Documents
Brainspace uses a control set as a way to evaluate the classifier training. To keep the control set effective, it is important to avoid using knowledge of the control set to guide your selection of training documents.
Validation Set
A random sample of documents in a dataset that have not been tagged for classification that is used to estimate the proportion of untagged documents that would be tagged positive if they were reviewed by people.
A validation set is a simple random sample from all documents that are available for supervised learning but have not already been tagged with the positive or negative tag for the classification. It is used to estimate the proportion of untagged documents that would be tagged positive if they were reviewed. This proportion is sometimes called “elusion,” though in this case it is the elusion of the review to date, not the elusion of the latest predictive model.
Concept Topics
CMML Document Scoring
CMML (and for that matter PC) uses a machine learning algorithm called logistic regression to produce its predictive models. The algorithm produces a predictive model which produces two scores, which you can see in the prediction report. The raw score (labeled “score” in the prediction report) is between minus infinity and plus infinity. The normalized probability score (labeled “chance_responsive” in the prediction report) is between 0 and 1.
The probability score can be interpreted as the current predictive model’s best guess at the probability the document is responsive. In other words, if you took a large number of documents that the predictive model all gave a probability score of 0.8, you would expect roughly 80% of them to be responsive. If that fact were to be true for all probability scores output by the model, we would say the model is “well-calibrated”.
A big caveat is that the predictive model will be poorly calibrated until the training set has a lot of training data that is representative of the dataset. In particular, it tends to take many rounds of active learning before the scores are decently calibrated, and calibration will never be perfect.
Since probability scores have a nice interpretation, why do we also have raw scores? The main reason is that you can, particularly when scores are poorly calibrated, get a lot of documents that all have scores of 1.0 but where some are really better than others. The raw score allows breaking those ties. The CMML interface sorts on the raw score for that reason.
Create Control Set Dialog
The following settings are available when creating a CMML control set:
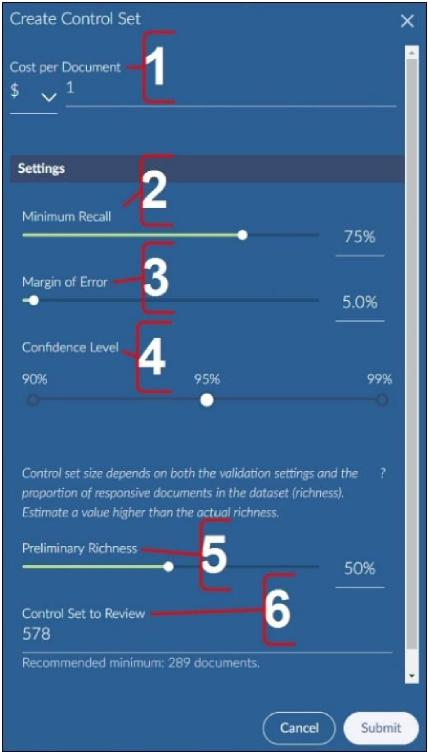
Estimate the cost-to-review per document for a specific currency type.
Provide the minimum threshold for recall.
Provide the margin of error.
Provide the confidence level.
Estimate preliminary richness. Brainspace will iterate until sufficient documents are added to the control set.
Choose the number of documents to include in the initial control set. A value will be suggested based upon the settings chosen and the estimated preliminary richness. Brainspace may suggest more documents be added in a later cycle if an insufficient number of documents are not in the control set.
CMML Documents Scored Across Training Rounds
The following features are available on the Documents Scored Across Training Rounds tab:
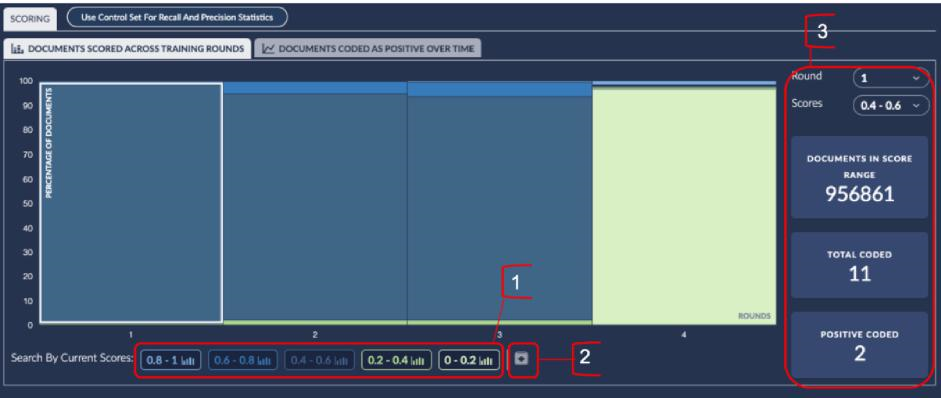
Score Band buttons when clicked take the current round score band to the Analytics view for the user to take further action. The bands are set to 5 default ranges that are currently fixed which are 0.8-1, 0.6-0.8, 0.4-0.6, 0.2-0.4 and 0-0.2. If you would like to specify the exact range of records you wish to analyze you should use the Predictive Rank graph Trim feature.
Download Score Distributions Report button downloads a report to your local downloads folder. This report can be viewed and edited for distribution to stakeholders that do not have access to Brainspace.
Round and Score dropdowns allow any of the rounds or score bands Documents In Score Range, Total Coded and Positive Coded counts to be displayed.
CMML Control Set Progress Tab
The following features are available on the Progress tab:
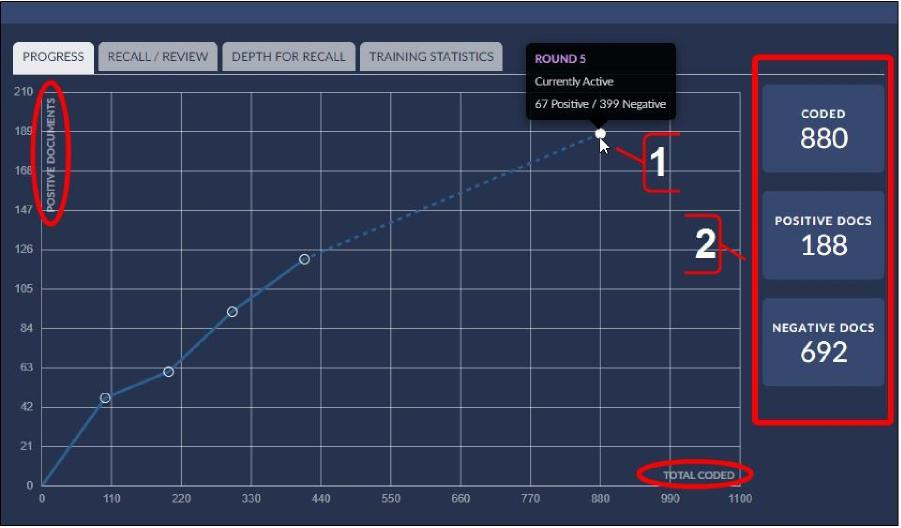
View the classifier training progress graph to compare the number of positive documents (y-axis) as a function of the total number of coded documents (x-axis) in each training round. View each training round’s status and the number of positive (responsive) and negative (non-responsive) documents in each training round. An upward slope suggests responsive documents are being added to the model. A flatter line suggests few responsive documents are being added to the model.
View only coded, positive, or negative documents in Analytics.
CMML Control Set Recall/Review Tab
The following features are available on the Recall/Review tab:
Note
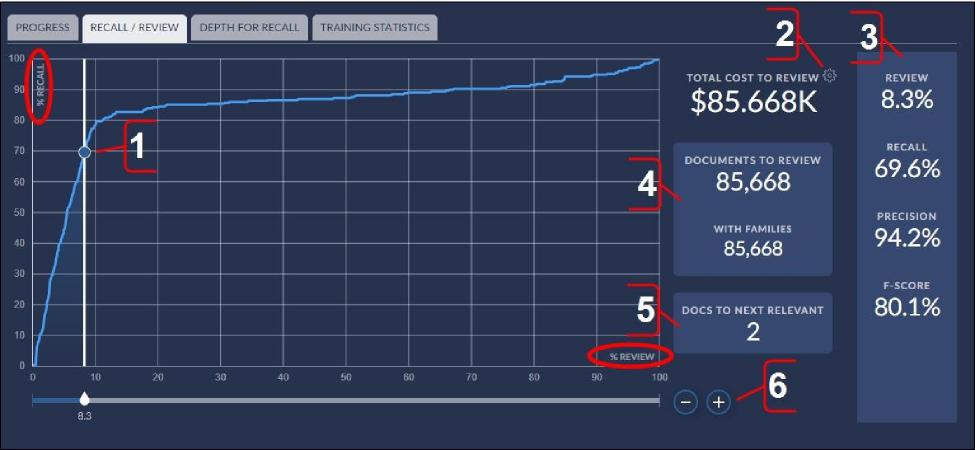
“Documents to review” is used on this graph to refer to all documents that would be recommended as responsive and assumes a further step of review of those documents before production.
View the classifier recall/review graph to compare the recall percentage (y-axis) as a function of the percentage of documents to review (x-axis) in the classifier. Drag the %Review node on the horizontal line to view the recall percentage and total cost to review the suggested documents at any stage of classifier training.
Change the currency type or monetary value for the classifier. This will change the estimated cost to review the documents recommended for as responsive by the model.
View the percentage of documents suggested as responsive (for further review) and the associated recall, precision, and F-score percentages for the selected position of the %Review node on the x-axis. These values change according to the %Review value selected on the x-axis (see items 2 and 6).
View the number of documents suggested as responsive (for further review) in the classifier and the number of documents after including families. These values change according to the %Review value selected on the x-axis (see items 2 and 6).
Estimate the number of documents that must be reviewed before finding the next document in the classifier that is likely to be relevant.
Micro-adjust the position of the %Review node on the x-axis to view the recall percentage number and total cost to review the suggested responsive documents at any stage of classifier training.
CMML Control Set Depth for Recall Tab
The following features are available on the Depth for Recall Graph tab:
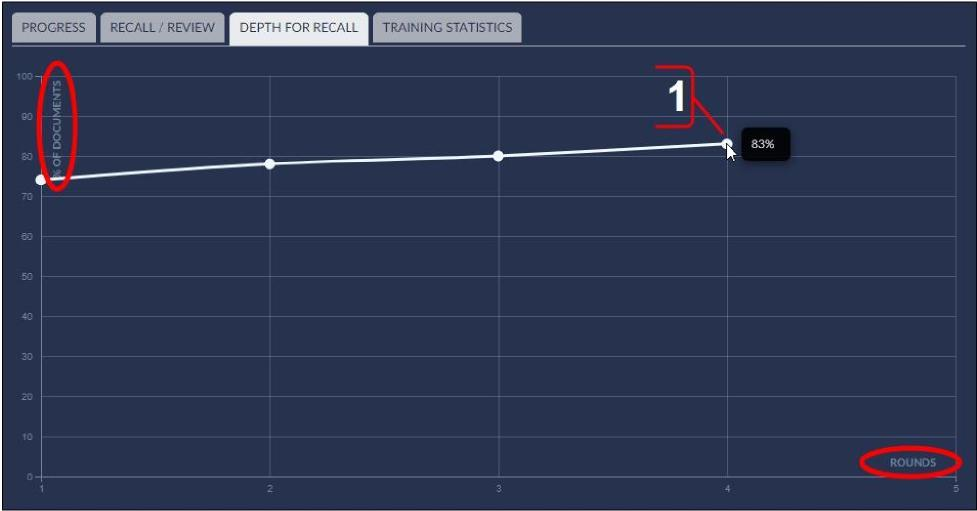
View the depth for recall graph to compare the percentage of documents of the classifier that would be considered responsive (y-axis) over the number of training rounds (x-axis) in the control set.
CMML Control Set Training Statistics Tab
The following features are available on the Training Statistics tab:
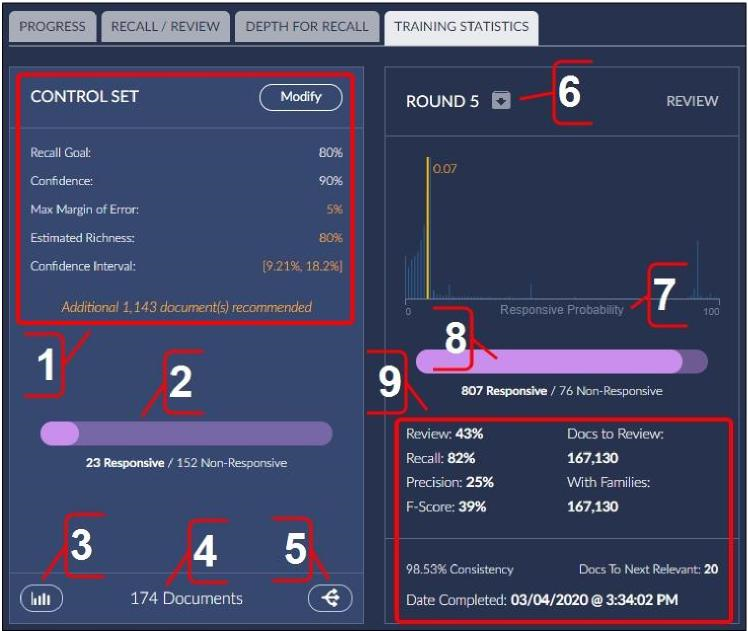
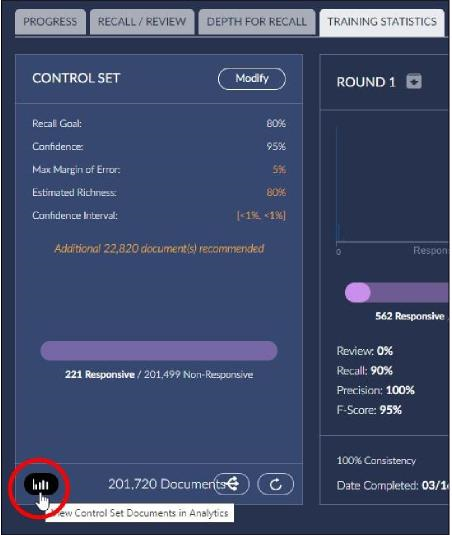
View and modify current control set settings. If more documents are recommended to get the control set to align with the validation settings requested, it will display a message here.
View the number and proportion of responsive documents and non-responsive documents in the control set.
Click to view control set documents as search results in the Analytics Dashboard.
View the total number of documents in the control set.
Convert the control set to a training round. Usually used if the control set is no longer desirable, or if the intent is to draw a brand new control set. This way, the effort of manual review of these documents currently in the control set is turned into training the model.
Download reports for a training round.
View the responsiveness probability value for a training round. A chart of all the documents in the classifier sorted by how likely they are to be responsive. Documents with a score of 0 are highly likely to be non-responsive, documents with a score of 1.00 are highly likely to be responsive. Note the graph displays from 0 to 100, but scores of documents go from 0 to 1.00.
View the number and proportion of responsive and non-responsive documents in a training round.
View statistics for a training round.
CMML Classifier with a Connect Tag
You can create a CMML classifier with or without using a Connect Tag. If you do not use a Connect Tag, control set review and all coding decisions are in Brainspace. When using a Connect Tag, however, you can pull the values for tags from Relativity® manually as needed, or you can create a schedule to pull the values for tags from Relativity® on a regular schedule.
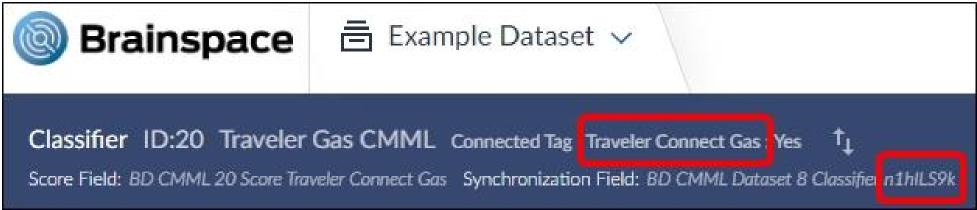
If adding a control set and using a Connect Tag in Brainspace, control-set review must take place in Relativity®. The name of the flagged field in Relativity® is different than the name of the Connect Tag in Brainspace. Brainspace automatically generates the tag name in Relativity® according to the following convention: BD CMML [First Eight Characters of the Dataset in Brainspace][First Seven Characters of the Classifier Name in Brainspace] xxxxxxxx CtrlSet Pos, where xxxxxxxx is replaced with a randomly generated unique value.
In the example below, the Connect Tag name is Traveler Connect Gas, and the Classifier ID is n1hILS9k, so the automatically generated Relativity® field that would need to be set for control set review would be BD CMML Travels n1hILS9k CtrlSet Pos.
To create a classifier with a Connect Tag, see Create CMML Classifier with a Connect Tag. For information on creating a field in a Relativity® Workspace, visit the Relativity® website for third-party product information.
CMML Validation Set
A validation set is a simple random sample drawn from a set of documents available for CMML classifier training that have not been tagged positive or negative in previous training rounds. A validation set is used to estimate the proportion of untagged documents that would be tagged positive if they were reviewed. This proportion is sometimes called “elusion” though in this case it is the elusion of the review to date, not the elusion of the latest predictive model.
Note
“Defensible” is a legal term, not a technical one. The elusion estimate is one of several pieces of technical information that could be relevant to an attorney arguing that the result of a particular TAR project is defensible.
You can create a validation set of any size. A validation set is tagged by the Brainspace user. To get elusion statistics, all documents in the validation set be must be tagged positive or negative without skipping any documents. When the validation set has been completely tagged, Brainspace displays an estimate of elusion, which is the proportion of untagged documents that belong to the positive (responsive) class of documents. The estimate is in the form of a 95 percent binomial confidence interval on elusion. The upper bound of this confidence interval is the value that is typically of interest, since it means we have 95 percent confidence that the true elusion is no higher than this.
For example, suppose you have 103,000 documents, and you have tagged 2,000 of them. There are now 101,000 untagged documents. You draw a validation set of 1,000 documents and tag them, finding that two of them are positive. The 95 percent binomial confidence interval on elusion is [0.0002, 0.0072], so you have 95 percent confidence that 0.0072 (0.72%) or fewer of the untagged documents are positive.
You can also translate that to actual document counts. Because you tagged the validation set, you now have 100,000 untagged documents. You can multiply the elusion confidence interval by that number to get a 95 percent confidence interval on number of untagged positive documents: [20, 720]. In other words, you are 95 percent confident that there are now between 20 and 720 untagged positive documents, and, in particular, you are 95 percent confident there are 720 or fewer positive untagged documents.
Frequently the validation set is used as a final round to provide this estimate of elusion, but if more training is desired, you can convert the validation set to a training round and continue training the model with more rounds. This doesn’t preclude you from creating another validation set later.
Continuous Multimodal Learning (CMML)
The CMML workflow can be carried out entirely in Brainspace, and integrates supervised learning with Brainspace’s tagging system. Predictive models can be trained simultaneously for as many binary classifications as desired. Training can be done using batches as in Predictive Coding or in a more flexible fashion by tagging documents anywhere they are viewed. Predictive models can be used to rank documents within Brainspace, and top-ranked documents can be selected for training. All of the training data selection methods provided in the Predictive Coding workflow may also be used. Predictive scores can be exported to third-party review platforms. If desired, a random sample may be drawn from unreviewed documents after a CMML review to estimate the fraction of target documents in the unreviewed material. The CMML approach supports workflows referred to as CAL (TM), TAR 2.0, and other e-discovery buzzwords, but CMML goes beyond them in ease of use, effectiveness, and the ability to leverage Brainspace’s wide range of analytics to find training data.
CMML with Adaptive Control Sets
Using an Adaptive Control Set with a CMML classifier serves the same purpose as a control set with a Predictive Coding classifier. A control set is a random sample of your dataset. After the random sample has been fully reviewed, it can be used to estimate richness, recall, precision, and depth for recall (DFR). The quality of these estimates depends on the size of the control set.
Note
Using an Adaptive Control Set with a CMML classifier is optional and can be used with a CMML classifier at any point during training (see Using an Adaptive Control Set).
Datasets must use a Relativity® Plus connector to use the Adaptive Control Set feature with Relativity® or in Brainspace only as well.
CMML with Automode
When used with a CMML classifier or control set, Automode automatically batches documents in training rounds for review. Automode can be used with a connected Reveal Project, Relativity® Workspace, or standalone Brainspace. When a training round review is complete and the training round is pulled back into the CMML classifier or control set, Automode automatically batches another training round for review, and this process continues until Automode is disabled. Automode is disabled by default, so Brainspace users must batch documents manually to create new training rounds until Automode is enabled.
Note
When using a dataset connected to Relativity®, the Automode feature is only available when using the Relativity® Plus connector and a Connect Tag. The legacy Relativity® connector does not support Automode.
Control Set Statistics
These statistics compare the scores assigned to documents by predictive models with specified cutoffs. Two types of statistics are available:
Statistics on the predictive model from the most recent training round can be seen to the right of the Recall / Review graph. The cutoff may be chosen by adjusting the slider on that graph. The vertical line corresponds to the current recall goal.
Statistics on predictive models from previous training rounds can be seen on the round cards. The cutoff corresponds to the recall goal at the time of that training round.
Control set statistics are based on omitting error documents and including only one document from each duplicate group. The duplicate groups are based on exact duplicates if the classifier uses text only and strict duplicates if the classifier uses text and metadata.
Recall and Review
To understand and adjust the score cutoff for auto-coding, move the slider on the Recall/Review graph to vary the score cutoff. Recall, review %, and other metrics are also included with the graph.
To understand progress at training the predictive model:
The Depth for Recall graph shows how training is reducing the review effort to hit the recall goal.
The round cards show metrics for each training round based on the recall goal:
Effectiveness: Estimated recall, precision, F1, review %, and docs to review—all based on the cutoff that hits the recall goal.
Consistency: How well the predictive model agreed with the training data.
CMML Training and Review
Documents discovered using any Brainspace Analytics feature can be tagged at any time. If a positive or negative value is assigned for a classifier tag, the document becomes an ad hoc document in the current open training round for that classifier. It will be added to the training set the next time a training round is closed for that classifier. Documents can be removed from the training set at any time either by untagging them or by tagging them with a value that is neither positive nor negative (e.g., a tag named “Skipped” to identify a document that is deliberately tagged as neither positive nor negative).
Each training round can also include a batch using any of the available training round types.
Some, all, or none of the batch documents can be reviewed and tagged before a training round is closed. Batches are selected from documents that have not been tagged.
CMML Prediction Report
The Prediction Report contains one row for each document and provides the following details about the scoring of CMML classifier documents by training round.
Each row in the Prediction Report contains the following fields:
key
The unique internal ID of the document.
responsive
This is “yes” if the document has been assigned the positive tag for the classification, “no” if assigned the negative tag, and blank if the document is untagged or given a tag that is neither positive nor negative.
predicted_responsive
This is “yes” if chance_responsive is 0.50 or more and “no” otherwise. A cutoff of 0.50 used with the predictive model creates a classifier that attempts to minimize error rate. Note that 0.50 is typically not the cutoff you would use for other purposes.
matches
This is “yes” if responsive is non-null and the same as predicted_responsive. This is “no” if responsive is non-null and different from predicted_responsive. Blank if responsive is null (e.g., the document is not a training document).
score
This is the raw score the predictive model produces for the document. It can be an arbitrary positive or negative number. The main use of score is for making finer-grained distinctions among documents whose chance_responsive values are 0.0 or 1.0.
chance_responsive
For predictive models that have been extensively trained, particularly by many rounds of active learning, chance_responsive is an approximation of the probability that a document is a positive example. Values are between 0.0 and 1.0, inclusive. This value is produced by rescaling the score value.
Uncertainty
The uncertainty value is a measure of how uncertain the predictive model is about the correct label for the document. It ranges from 0.0 (most uncertain) to 1.0 (least uncertain). The uncertainty value can be used to identify documents that might be good training documents. Uncertainty is one factor used by Fast Active and Diverse Active training batch selection methods. This value is produced by rescaling the chance_responsive value.
term1, score1,...term 8, score 8
The terms that make the largest magnitude contribution (positive or negative) to the score of the document, along with that contribution.
CMML Consistency Report
The Consistency Report includes rows from the Prediction Report that correspond to training examples for a CMML classifier. It is useful for understanding how the predictive model acts on the documents used to train it. There are two main purposes for the Consistency Report:
To understand which training examples contributed particular terms to the predictive model.
To find training examples that might have been mistagged (search the “matches” field for “no”).
CMML Round Report
The Round Report for training round K contains one row for each training round from 1 to K. The row for a training round summarizes information about the training set used on that round.
Note
Tags can have more than two values, but only one tag value is associated with the positive category for a classification, and one value is associated with the negative category for a classification. Document with other tag values are not included in the training set.
Documents can be untagged and retagged using a different tag choice. For that reason, it is possible that some documents that were in a training set on an earlier round are no longer in the training set in a subsequent training round.
CMML Round Report Fields
Each row in the CMML Round Report contains the following fields:
Training Rounds
The training round number in the series of classifier training rounds.
Number of Docs
The number of new documents added to the training set for the training round. It includes new documents from both the training batch, if any, and the ad hoc tagged documents, if any. This count does not include documents that were in the training batch on the previous round. The count includes documents with changed labels. The count is also not reduced if some document tags were removed from the previous round’s training batch or converted to non-classification tag values on the current round. For that reason, the Number of Docs count is never negative.
Net Manual Docs
This is the net number of new documents contributed by ad hoc tagging to the training set on the current round. It takes into account documents that have new positive or negative tag values. It also takes into account documents that had a positive or negative tag value at the end of the previous training round but no longer have that value. For that reason, the Net Manual Docs value can positive, negative, or zero.
Classification Model
This column specifies the method that was used to create the training batch, if a batch creation method was used on a training round. If the only ad hoc documents were tagged in a training round, the value REVIEW is used.
Cumulative Coded
The total number of documents in the training set at the end of a training round.
Cumulative Positive
The total number of documents with positive tag values at the end of a training round.
Cumulative Negative
The total number of documents with a positive tag value at the end of a training round.
Round Positive
The net change in the number of positive training documents since the previous training round.
Round Negative
The net change in the number of negative training documents since the previous training round.
Consistency
This is the proportion of training set examples where the manually assigned tag disagrees with the prediction of a minimum error rate classifier (CMML Prediction Report).
Unreviewed Docs
Number of documents that are not tagged either positive or negative. Populated only for validation rounds.
Estimated Positive (lower bound)
Lower bound on a 95 percent binomial confidence interval on the proportion of positive documents among the documents not yet tagged as either positive or negative. Populated only for validation rounds.
Estimated Negative (lower bound)
Upper bound on a 95 percent binomial confidence interval on the proportion of positive documents among the documents not yet tagged as either positive or negative. Populated only for validation rounds.
Task Topics
Create a CMML Classifier
You can create a CMML classifier using all of the documents or a subset of documents in a dataset. To create a CMML classifier using a subset of documents in a dataset, see Create a Focus. You can also create a CMML classifier before or after tagging documents.
The following procedure describes how to create a CMML classifier using all of the documents in a dataset with no existing tag choices and no pre-tagged documents.
To create a CMML classifier:
Click the Supervised Learning tab.
The Supervised Learning screen will open.
Click the New Classifier button.
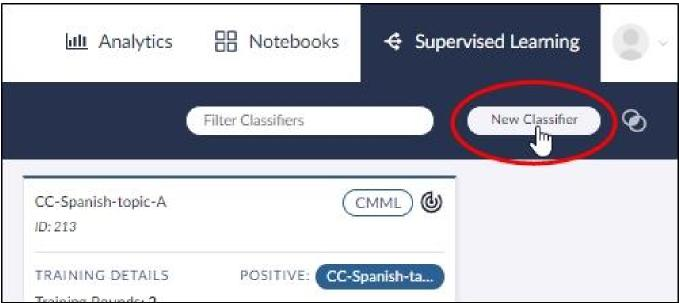
In the dropdown list, click the CMML option. The New CMML Classifier dialog will open.
Type a name for the CMML classifier.
Click Create Tag, and then type a name for the tag.
Note
When you name the tag, Brainspace automatically creates a positive and a negative choice for the tag.
Click the Save button.
The Classifier screen will open.
Click the New Training Round button.
The Create a Training Round dialog will open.
Click the Round Types dropdown menu, and then click Influential.
Note
You must choose the Influential training round type for the first training round.
In the Size of Training Round (Max 5000) text field, type the number of documents that you want to include in the first training round.
Note
As a general rule, 200 documents will provide good classifier training and will help when choosing documents to include in subsequent training rounds.
Click the Continue button. The training round will begin.
After the training round documents have been selected, click the Refresh button. The classifier Progress graph and Training pane will refresh to show the results of the first training round.
Review the documents in the training round:
Click the Review button.
A document open in the Document Viewer.
Click the [Tag Name]: Positive or [Tag Name]: Negative button for each document.
Note
You can click the X icon at any point during the review session to return to the Classifier screen before you finish reviewing all of the documents. If you review all documents in the training round, the Classifier screen will open automatically.
Click the Refresh button.
Click the Train Now button.
When the Classifier screen refreshes, the first training round has completed, a predictive model has been built, and every document in the classifier has been scored and assigned a predictive rank. By default, the document list displays all of the untagged documents in the CMML classifier, with the highest scoring document on the top of the list and the lowest scoring document on the bottom of the list.
Repeat steps 4, 5, and 6 to create all subsequent training rounds.
Note
For the second and all subsequent training rounds, you can choose any of the available training round types.
At any point during CMML classifier training, you can open the classifier in Analytics, add additional training documents, add tags, compare training rounds, or download training round reports. After you have finished training the CMML classifier, you can use it to create a validation set or a control set.
Create a CMML Classifier Using a Connect Tag
Before creating a CMML classifier using a Connect Tag, a field must be created in a Relativity® Workspace, and a Connect Tag must be created in Brainspace.
The following procedure describes how to create a CMML classifier using all of the documents in a dataset with an existing Connect Tag choice and no pre-tagged documents.
To create a CMML classifier using a Connect Tag:
Click the Supervised Learning tab.
The Supervised Learning screen will open.
Click the New Classifier button.
In the dropdown list, click the CMML option.
The New CMML Classifier dialog will open.
Type a name for the CMML classifier.
With the Assign Tag option selected, click Select a Positive Choice or Select a Negative Choice.
The New CMML Classifier dialog will expand to display the Connect Tag choices.
Click a Connect Tag
 in the list of existing tags.
The New CMML Classifier dialog will refresh.
Note
You have the option of tagging documents before or after creating the first training round. For this procedure, we will tag documents after creating the first training round.
Click the Save button.
The Relativity® login credentials dialog will open.
Type your Relativity® User Name and Relativity® Password, and then click the Use these credentials button.
After your Relativity® credentials are verified, the Classifier screen will open.
Click the Refresh button.
Click the New Training Round button.
The Create a Training Round dialog will open.
Click the Round Types dropdown menu, and then click Influential.
Note
You must choose the Influential training round type for the first training round.
In the Size of Training Round (Max 5000) text field, type the number of documents that you want to include in the first training round.
Note
As a general rule, 200 documents will provide good classifier training and will help when choosing documents to include in subsequent training rounds.
Click the Continue button. The training round will begin.
After the training round documents have been selected, click the Refresh button. The classifier Progress graph and Training pane will refresh to show the results of the first training round.
Note
After creating a CMML classifier with a Connect Tag, the Connect Tag
icon and Relativity® field name will display in the classifier information field: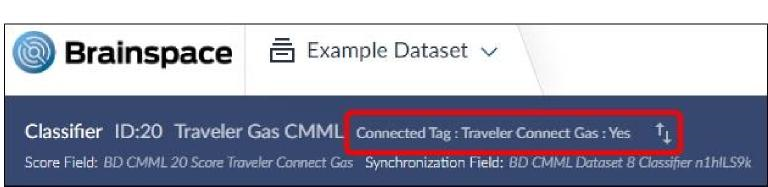
In this example, the Relativity® field name is Traveler Connect Gas. The information on the Classifier screen is identical to the information on the Classifier card.
Using the field chosen for the Connect Tag, review the documents in Relativity®.
Note
The Review button will be greyed-out in Brainspace when using Connect Tags from Relativity®. Any tagging done in Relativity® will overwrite the tagging in Brainspace, so the ability to review documents in Brainspace is disabled. Note that the definition of a Connect Tag implies that Relativity® is the database of record.
Click the Refresh button.
Click the Train Now button.
When the Classifier screen refreshes, the first training round has completed, a predictive model has been built, and every document in the classifier has been scored and assigned a predictive rank. By default, the document list displays all of the untagged documents in the CMML classifier, with the highest scoring document on the top of the list and the lowest scoring document on the bottom of the list.
Repeat steps 4, 5, 6, 7, and 8 to create all subsequent training rounds.
Note
For the second and all subsequent training rounds, you can choose any of the available training round types.
After creating a Connect Tag, you can update it manually or create a schedule to update the Connect Tag automatically.
Schedule an Automatic Update to a Connect Tag
After creating a CMML classifier using a Connect Tag, you can update it manually or create a one-time or recurring schedule for future Connect Tag updates.
To schedule an automatic update to a Connect Tag:
Click the Supervised Learning tab.
The Supervised Learning screen will open.
Click a Classifier card.
The Classifier screen will open.
Click the Schedule Update icon:
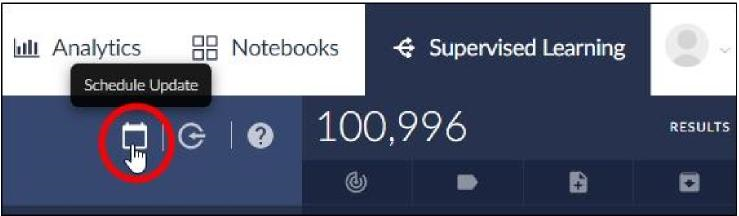
The Scheduler dialog will open.
To pull the reviewed field from Relativity® into the Connect Tag in Brainspace and update the predictive model, do one of the following:
To update the tag immediately, click the Update Now button.
To schedule a tag update for a specific date, click the Schedule Next Update text field, click a date in the calendar, and then click the Apply button.
To schedule a recurring update, toggle the Recurring switch to the On position, choose Daily, Twice Daily, or Weekly, and then select times and days as prompted.
Click the Save button.
When the scheduled time arrives, Brainspace automatically pulls the Connect Tag from the Relativity® or third-party database and rebuilds the predictive model. You can also export the scores from Brainspace to the Relativity® or third-party database.
Pull a Connect Tag from a Relativity® Workspace
After creating a CMML classifier using a Connect Tag, you can pull the Connect Tag into Brainspace from a Relativity® Workspace manually as needed.
To pull a Connect Tag into Brainspace from a Relativity® Workspace:
Click the Supervised Learning tab.
The Supervised Learning screen will open.
Click a Classifier card.
The Classifier screen will open.
Click the Pull Tag icon:
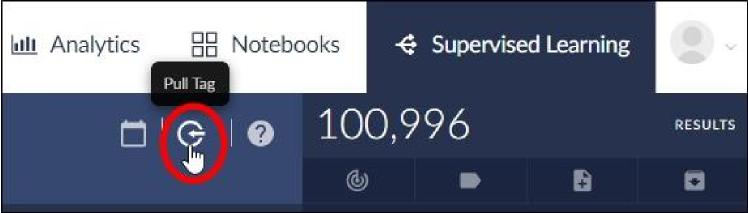
Brainspace will begin pulling the Connect Tag.
Note
You will be prompted to enter your Relativity® credentials if you have not saved your username and password for the Relativity® Plus connector.
After pulling the Connect Tag into Brainspace, you can schedule automatic Connect Tag updates or continue training the CMML classifier.
Set the Automode Polling Interval for a CMML Training Round with a Connect Tag
At any time after creating a CMML classifier with a Connect Tag, you can set the Automode polling interval to set the frequency for Brainspace to request review scores.
To set the Automode polling interval:
Click the Supervised Learning tab.
The Supervised Learning screen will open.
Click a Classifier card.
The Classifier screen will open.
In the Training pane, click the Training Round Settings icon:
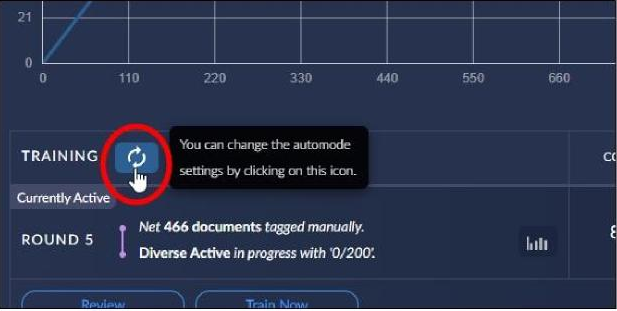
The Training Round Settings dialog will open.
In the Polling Interval text fields, type a value for hours and a value for minutes.
Click the Apply button.
Note
If prompted, enter your Relativity® credentials.
After setting the polling interval, Automode will pull all reviewed documents from Relativity® into the CMML classifier as scheduled.
Change the Automode Training Round Type
At any time after creating a CMML classifier with a Connect Tag and running the first CMML classifier training round, you can change the current Automode training round type at any time.
Note
For the first training round, you must use the Influential training round type.
To change the Automode training round type:
Click the Supervised Learning tab.
The Supervised Learning screen will open.
Click a Classifier card.
The Classifier screen will open.
In the Training pane, click the Training Round Settings icon:
The Training Round Settings dialog will open.
In the Document Selection pane, click the Diverse Active Learning or Top Scores radio button.
Click the Apply button.
Note
If prompted, enter your Relativity® credentials.
After setting the polling interval, Automode will pull all reviewed documents from Relativity® into the CMML classifier as scheduled.
Create an Adaptive Control Set for an Existing CMML Classifier
After creating a CMML classifier or any time during the classifier training process, you can create a CMML control set to calculate precision and recall statistics.
Note
At any time during training, you can recycle the control set, view control set documents in Analytics, convert the control set to a training round, or modify the control set’s settings.
To create a control set for an existing CMML classifier:
Click the Supervised Learning tab.
The Supervised Learning screen will open.
Click a Classifier card.
The Classifier screen will open.
Click the Use Control Set for Recall and Precision Statistics button. The Create Control Set dialog will open.
In the Create Control Set dialog, do the following:
In the Cost per Document text field, change the monetary symbol if necessary, and then type a monetary value.
Set the Minimum Recall.
Set the Margin of Error.
Set the Confidence Level.
Set the Preliminary Richness.
In the Control Set to Review text field, type the number of documents to include in the control set.
Click the Submit button.
The Classifier screen will refresh.
Click the Tag Control Set to Set Statistics button. The Document Viewer will open.
Tag all of the documents in the control set.
After you have tagged the last document, the Document Viewer will close automatically, and the CMML classifier screen will refresh.
After creating the CMML control set, you can review the control set’s training progress graph, recall and review graph, depth for recall graph, and training statistics for each training round.
Modify a CMML Adaptive Control Set
After creating a CMML control set and performing the initial review of the precision and recall statistics, you can modify the control set’s settings at any time during training.
To modify a CMML control set:
Click the Supervised Learning tab.
The Supervised Learning screen will open.
Click a Classifier card.
The Classifier screen will open.
Click the Training Statistics tab.
In the Control Set pane, click the Modify button.

The Modify Control Set dialog will open.
Modify the following settings:
Set the Minimum Recall.
Set the Margin of Error.
Set the Confidence Level.
In the Control Set to Review text field, type the number of documents to include in the control set.
Click the Submit button.
The Classifier screen will refresh.
Click the Continue Review button. The Document Viewer will open.
Tag all of the new documents in the control set.
After you tag the last document, the Document Viewer will close, and the Classifier screen will refresh.
After modifying a control set, you can change the control set settings again at any point during training.
Convert a CMML Adaptive Control Set to a Training Round
After creating and using a control set to measure the health of a predictive model, you can convert the control set to a training round to retain reviews on the control set’s documents when the control set is no longer needed or when a new control set is required.
Note
Before converting a control set to a training round, close any active training rounds by disabling Automode, if enabled, and clicking the Train Now button.
Note
After recycling a control set, you will not be able to view training statistics until you create a new CMML control set and tag documents.
To convert a CMML control set to a training round:
Click the Supervised Learning tab.
The Supervised Learning screen will open.
Click a Classifier card.
The Classifier screen will open.
Click the Training Statistics tab.
In the Control Set pane, click the Convert control set to training round button.

A confirmation dialog will open.
Click the Recycle button.
The confirmation dialog will close.
Click the Refresh button.
The Classifier screen will refresh.
After converting a CMML control set to a training round, can continue training the CMML classifier and create a new CMML control set.
View CMML Adaptive Control Set Documents in Analytics
After creating a CMML control set, you can view its documents in Analytics. To view CMML control set documents in Analytics:
Click the Supervised Learning tab.
The Supervised Learning screen will open.
Click a Classifier card.
The Classifier screen will open.
Click the Training Statistics tab.
In the Control Set pane, click the View Control Set Documents in Analytics button.
The Analytics Dashboard will open.
After opening the control set’s documents in Analytics, you can search and analyze the documents using any of the Analytics features in Brainspace (see Cluster Wheel, Communications, Conversations, Thread Analysis, Results pane, Document Viewer).
Pull Reviewed Document Tags into a CMML Adaptive Control Set
After documents have been tagged in a Relativity®, you can pull reviewed document tags from a Relativity® Workspace into a CMML control set.
To pull reviewed document tags into a CMML control set:
Click the Supervised Learning tab.
The Supervised Learning screen will open.
Click a Classifier card.
The Classifier screen will open.
Log in to Relativity®, if prompted, and then click the Get Review from RelativityPlus button.
After Brainspace pulls the tags, a control set training round will initiate automatically.
After pulling document tags from Relativity® into Brainspace, you can continue training the CMML control set, convert the CMML control set to a training round, or view control set documents in Analytics.
Enable Automode for an Existing CMML Classifier
Automode can be enabled when creating a CMML classifier or after creating a CMML classifier. The procedure below describes how to enable Automode for an existing classifier.
To enable Automode for an existing CMML classifier:
Click the Supervised Learning tab.
The Supervised Learning screen will open.
Click a Classifier card.
The Classifier screen will open.
In the Training pane, click the Training Round Settings
 icon. The Training Round Settings dialog will open.
Toggle the Enable automatic training switch to the On position.
In the Round Size text field, type the number of documents to include in the training rounds.
Select either the Diverse Active Learning or Top Scores radio button.
Note
For the first training round, you must choose the Influential training round type. After the first training round, your selection will apply to all subsequent training rounds.
Click the Apply button.
The Training Round Settings icon will change to indicate that Automode is enabled
 , and the first automatic training round will initiate automatically.
After enabling Automode, new training rounds will initiate automatically after manually tagging documents in the CMML classifier. For subsequent training rounds, you can modify the Automode training round size or disable Automode at any time.
Disable Automode for a CMML Classifier
After enabling Automode for a CMML classifier, you can disable the automatic training feature at
any time to create subsequent training rounds manually.
To disable automatic training for a CMML classifier:
Click the Supervised Learning tab.
The Supervised Learning screen will open.
Click a Classifier card.
The Classifier screen will open.
In the Training pane, click the Training Round Settings icon:
The Training Round Settings dialog will open.
Toggle the Enable automatic training switch to the Off position.
Click the Apply button.
The Classifier screen will refresh, and the Training Round Settings icon will change to indicate that Automode is disabled
.
After disabling Automode, you must create subsequent training rounds manually.
Modify Automode Round Size
After enabling Automode and setting the round size for automatic training rounds, you can increase or decrease the number of documents in subsequent automatic training rounds at any time.
To increase or decrease the number of documents in automatic training rounds:
Click the Supervised Learning tab.
The Supervised Learning screen will open.
Click a Classifier card.
The Classifier screen will open.
In the Training pane, click the Training Round Settings icon:
The Training Round Settings dialog will open.
In the Round Size text field, type a new number to increase or decrease the number of documents in automatic training rounds.
Click the Apply button.
The Training Round Settings dialog will close, and the Classifier screen will refresh.
The next training round will include the revised number of documents.
View the Progress Graph for a CMML Classifier
After creating a CMML classifier and running the first training round, the Progress graph will show the total number of positive documents (y-axis) relative to the total number of coded documents (x-axis).
To view a CMML classifier Progress graph:
Click the Supervised Learning tab.
The Supervised Learning screen will open.
Click a Classifier card.
The Classifier screen will open, and the Progress graph will display by default.
You can also view all of the CMML classifier’s coded documents, all positive documents, or all negative documents in Analytics.
If a control set has been created and reviewed for the classifier, you can review the control set’s training progress graph, recall and review graph, depth for recall graph, and training statistics for each training round.
View All Coded CMML Classifier Documents in Analytics
After creating a CMML classifier and running the first training round, the Progress graph will display the total number of positive documents (y-axis) relative to the total number of coded documents (x-axis).
To view a CMML classifier’s coded documents in Analytics:
Click the Supervised Learning tab.
The Supervised Learning screen will open.
Click a Classifier card.
The Classifier screen will open, and the Progress graph will display by default.
Click the Coded button:
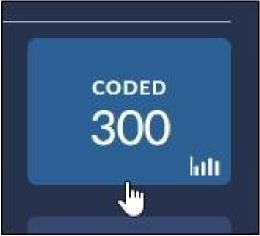
The Analytics Dashboard will open.
After viewing a CMML classifier’s coded documents in Analytics, you can also view only positive documents or only negative documents in Analytics.
View All Positive CMML Classifier Documents in Analytics
After creating a CMML classifier and running the first training round, the Progress graph will display the total number of positive documents (y-axis) relative to the total number of coded documents (x-axis).
To view a classifier’s positive documents in Analytics:
Click the Supervised Learning tab.
The Supervised Learning screen will open.
Click a Classifier card.
The Classifier screen will open, and the Progress graph will display by default.
Click the Positive Docs button:
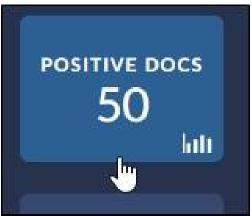
The Analytics Dashboard will open.
After viewing a CMML classifier’s positive documents in Analytics, you can also view all coded documents or only negative documents in Analytics.
View All Negative CMML Classifier Documents in Analytics
After creating a CMML classifier and running the first training round, the Progress graph will display the total number of positive documents (y-axis) relative to the total number of coded documents (x-axis).
To view a CMML classifier’s negative documents in Analytics:
Click the Supervised Learning tab.

The Supervised Learning screen will open.
Click a Classifier card.
The Classifier screen will open, and the Progress graph will display by default.
Click the Negative Docs button:
The Analytics Dashboard will open.
After viewing a CMML classifier’s negative documents in Analytics, you can also view all coded documents or only positive documents in Analytics.
View the Recall/Review Graph for a CMML Control Set
After creating a CMML classifier, creating and reviewing a control set, and running the first training round, the Progress graph will display the total number of positive documents (y-axis) relative to the total number of coded documents (x-axis).
To view a CMML control set Recall/Review graph:
Click the Supervised Learning tab.
The Supervised Learning screen will open.
Click a Classifier card.
The Classifier screen will open, and the Progress graph will display by default.
Click the Recall/Review tab.
The Recall/Review graph will display the recall percentage relative to the review percentage.
After viewing the Recall/Review graph and associated statistics, you can update cost and currency information and analyze the total cost to review the control set.
Update Cost and Currency for a CMML Control Set
After creating a CMML control set, you can update the currency type and cost per document value at any time to analyze the cost to review a control set.
To update cost and currency for a CMML control set:
Click the Supervised Learning tab.
The Supervised Learning screen will open.
Click a Classifier card.
The Classifier screen will open, and the Progress graph will display by default.
Click the Recall/Review tab.
Click the Update Cost and Currency icon:

The Update [classifier name] dialog will open.
Select a new currency symbol from the dropdown list, if required, and then type a new monetary value in the Cost per Document text field.
Click the Save Changes button.
The Recall/Review tab will refresh with new values in the Total Cost to Review field.
After updating the cost and currency for a CMML control set, you can adjust the number of documents in a control set by converting the control set to a training round and then creating a new CMML classifier, and you can analyze the cost to review documents at different intervals on the Recall/Review graph.
Analyze a CMML Control Set’s Total Cost to Review
After running a training round, you can analyze the total cost to review documents in a CMML classifier at different points in the review process by changing the % Review value on the x-axis of the Recall/Review graph.
To analyze the a CMML control set’s total cost to review:
Click the Supervised Learning tab.
The Supervised Learning screen will open.
Click a Classifier card.
The Classifier screen will open, and the Progress graph will display by default.
Click the Recall/Review tab.
Click the Plus or Minus button:

The vertical % Review bar will move on the x-axis.
After moving the vertical % Review bar, the Total Cost to Review, Documents to Review, Documents to Review with Families, and Review fields will refresh.
View the Depth for Recall Graph for a CMML Control Set
After running a training round, you can view the depth for recall percentage for each training round displayed in the Depth for Recall graph.
To view the Depth for Recall percentage for a training round:
Click the Supervised Learning tab.
The Supervised Learning screen will open.
Click a Classifier card.
The Classifier screen will open, and the Progress graph will display by default.
Click the Depth for Recall tab.
Hover over a node in the graph:
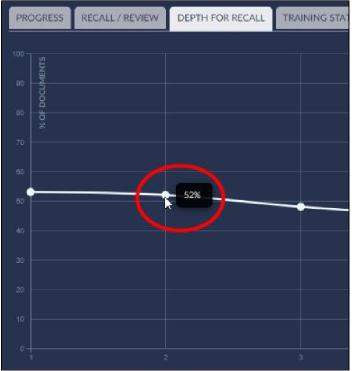
The percent of documents value will display for the selected round.
View Control Set Information and Training Statistics
After running a training round, you can view and manage control set information and training statistics for each training round.
To view control set information and training statistics:
Click the Supervised Learning tab.
The Supervised Learning screen will open.
Click a Classifier card.
The Classifier screen will open, and the Progress graph will display by default.
Click the Training Statistics tab.
The Control Set pane and Round # panes will display.
In the Control Set pane, you can modify the control set settings, view control set documents in Analytics, or convert the control set to a training round. In the Round # pane, you can review training statistics and download CMML reports for each training round in the control set.
Create a CMML Classifier from a Portable Model
After creating a portable model, you can use it to create a new CMML classifier.
To create a CMML classifier using a portable model:
Click the Supervised Learning tab.
The Supervised Learning screen will open.
Click the New Classifier button.
In the dropdown list, click the CMML option. The New CMML Classifier dialog will open.
Click Import portable model... :
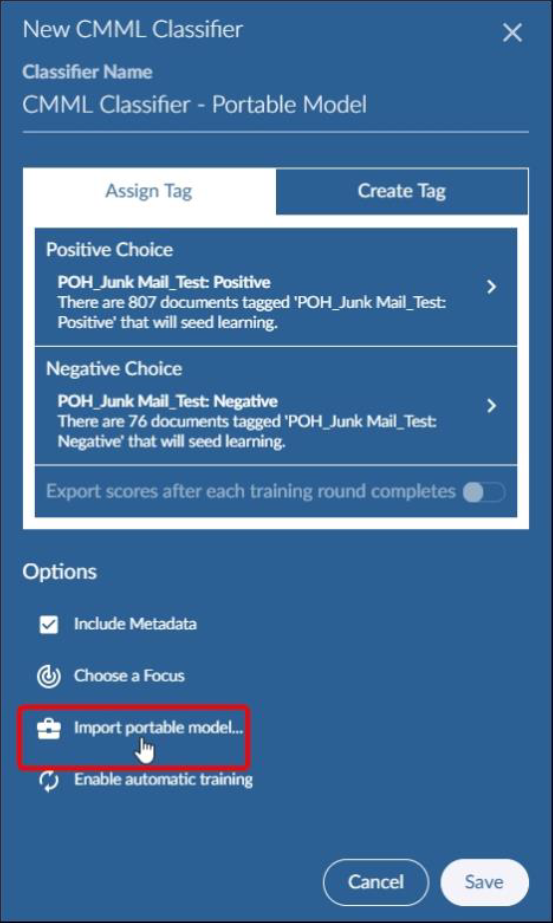
Do one of the following:
To upload a portable model that is not in Brainspace, click Upload Portable Model button, and then navigate to the *.csv file in your directory.
To use an existing portable model in Brainspace, click Choose an Existing Portable Model, and then click a portable model in the pop-up dialog. Only portable models that have been provided to your group from the Brainspace Portable Model library will be available. The Portable Model library is controlled by the Administrator panel.
Create a Top Scores Training Round for an Existing CMML Classifier
At any time after creating a CMML classifier and running the first training round, you can choose the Top Scores training-round type to train the classifier, even if using Automode.
Note
When creating a CMML classifier, you must use either a manual round (picking and tagging documents), an ad hoc round, or the Influential training round type for the first training round if you are not using a portable model to create the CMML classifier.
To enable Automode to select Top Scores training rounds for an existing CMML classifier:
Click the Supervised Learning tab.
The Supervised Learning screen will open.
Click a Classifier card.
The Classifier screen will open.
In the Training pane, click the Training Round Settings icon:
The Training Round Settings dialog will open.
Toggle the Enable Automatic Training switch to the On position.
Click the Top Scores radio button.
Click the Apply button.
The Training pane will refresh to display the Top Scores training round.
Choose a Top Scores Training Round for an Existing CMML Classifier
To choose a Top Scores training round for an existing CMML classifier:
Click the Supervised Learning tab.
The Supervised Learning screen will open.
Click a Classifier card.
The Classifier screen will open. If no Training round is currently active, click the New Training Round button:

The Create a Training Round dialog will open.
Select Top Scores from the dropdown menu.
Provide the number of documents to be chosen from the top scoring documents.
Click the Continue button.
The Training pane will refresh to display the Top Scores training round.
The number of documents requested will be chosen from the top scoring documents for this Classifier. Review will continue as normal.
After Brainspace runs the Top Scores training round, you can run additional training rounds using any of the available training round types, view training data and graphs, view Model Insights, create a portable model, and view training round documents in Analytics.
Create a CMML Classifier Using a Focus (Targeted Learning)
It is possible to build a CMML classifier against just a focus so that all training and scoring will occur with just the documents in the focus. This allows for a more concentrated effort, especially if there are a large number of documents in the dataset that are clearly not of interest.
For example, a dataset called English Wikipedia contains 4.3 million documents, but only 21,000 of those documents are related to the concept “Apollo.” Given that the rest of the documents in the dataset are unrelated to Apollo, there is no need to consider them for training or assign predictive ranks to them. When using a Focus with the Relativity® integration, scores for only the 21,000 documents will be overlaid in Relativity® each time the model is updated instead of the entire corpus of 4.3 million documents, a dramatic improvement in processing time, Relativity® interaction and bandwidth.
After creating a public Focus, you can use it to create a CMML classifier.
Note
The public Focus must be successfully built before you can use it to create a CMML classifier.
To create a CMML classifier using a public Focus:
Click the Supervised Learning tab.
The Supervised Learning screen will open.
Click the New Classifier button.
In the dropdown list, click the CMML option. The New CMML Classifier dialog will open.
Click Choose a Focus:

The Select Focus dialog will open.
Click a public Focus in the list.
Continue with the classifier as normal. All training documents will be drawn only from the documents in the Focus, and only the documents in the Focus will be assigned scores.
Create a Validation Set
After evaluating a CMML classifier, you can create a validation set to estimate the proportion of untagged documents that would be tagged positive if they were reviewed.
To create a validation set:
Click the Supervised Learning tab.
The Supervised Learning screen will open.
Click a Classifier card.
The Classifier screen will open.
In the Training pane, click the Create Validation Set button:
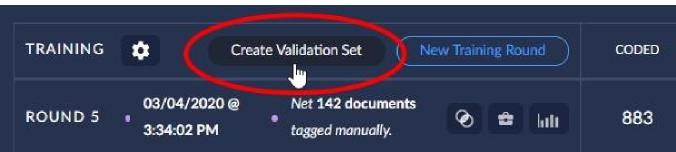
The Create a Validation Set dialog will open.
In the text filed, type the number of documents to include in the validation set, and then click the Continue button.
The Classifier screen will refresh, and the validation build will begin.
Note
A validation set can include an unlimited number of documents.
After creating the validation set, you will review the validation set in the same way you would review a training round. After completing the review, you will receive statistics. You can also convert the validation set to a training round to continue training the classifier.
End CMML Classifier Training
Determining when to end training a CMML classifier is not an obvious decision. Setting aside questions of cost and time and simply looking at the model itself to decide when to end training a CMML classifier, the following are a few criteria or steps to consider:
The purpose has been served. Sometimes, it is useful just to know if certain documents exist. Finding them completes this task, and there is no further reason to invest more training. Other times, you just want to find enough documents to tell the story of what happened, and having found enough, the task is done.
Exhaust ways of finding good documents. Do not stop training until you’ve used up your good ideas. If you still have good ideas about how to find new kinds of training examples manually (conceptual search, metadata search, looking at particular custodians, etc.) then use them to create manual training batches. If active learning is not coming up with many responsive documents, consider training on top-ranked documents using the Top Scores training round.
Confirm declining precision of top-ranked unreviewed documents. If reviewing the top-ranked documents is producing few to no responsive document, then it’s possible the model is reaching an end to its ability to suggest new likely to be responsive documents. Using a round or few of Diverse Active (if none have been used previously) may help to fill in the gaps or hedge against human bias.
Confirm declining score of top-ranked unreviewed document. As the score of the remaining top-ranking documents drops, the likelihood of them being responsive is diminishing.
Building a focus on top-ranked documents (with cutoff chosen to be below the vast majority of positive documents). Using the wheel to look for clusters that appears to be new types of information on the topic of interest. Tagging both positive and negative documents from those clusters may feed useful information into the model.
Create a validation set. If the validation set suggests there are few remaining responsive documents to be found, then it may be that training should complete.
Create a control set. Keep in mind that control sets can be comparatively expensive, but if a stronger measure of the model is needed, then they are a powerful tool to deploy. With the provided measurements of recall, precision and other metrics, it can be easier to see if the model is progressing over rounds or appears to be approaching completion.
Create a CMML Training Round Using a Public Notebook
After creating a CMML classifier, you can use untagged documents in a public notebook to create a training round for a CMML classifier.
Note
A public notebook can only be used once for classifier training. If documents in a notebook have been tagged in a previous training round, the round in the Training pane will display “closed with no documents coded” if you attempt to use the notebook after its documents have been tagged in training.
To create training round using a public notebook:
Click the Supervised Learning tab.

The Supervised Learning screen will open.
Click a Classifier card.
The Classifier screen will open.
In the Training pane, click the New Training Round button.
The Create Training Round dialog will open with the Notebook round type selected by default.
Click the Notebook Name field.
A list of public notebooks will open.
Click a notebook in the list, and then click the Continue button.
The Create Training Round dialog will close, and the notebook documents will be loaded into the CMML classifier.
In the Training pane, click the Train Now button.
The training round will begin.
After the training round completes, the Training pane will refresh to show the notebook training round and associated statistics. At any point during or after CMML classifier training, you can open the classifier in Analytics, add additional training documents, add tags, compare training rounds, or download training round reports. After you have finished training the CMML classifier, you can use it to create a validation set or a control set.
Create a Random Training Round for an Existing CMML Classifier
After creating a CMML classifier, you can use a Random training round to train the classifier. When you use Random training, Brainspace chooses a random sample of documents in the dataset that have not been used in previous training rounds.
To create a Random training round:
Click the Supervised Learning tab.
The Supervised Learning screen will open.
Click a Classifier card.
The Classifier screen will open.
In the Training pane, click the New Training Round button.
The Create Training Round dialog will open.
Click the Round Types dropdown menu, and then click Random.
In the Size of Training Round (Max 5000) text field, type the number of documents to include in the training round.
Click the Continue button.
The Create Training Round dialog will close.
In the Training pane, click the Train Now button.
The training round will begin.
After the training round completes, the Training pane will refresh to show the notebook training round and associated statistics. At any point during CMML classifier training, you can open the classifier in Analytics, add additional training documents, add tags, compare training rounds, or download training round reports. After you have finished training the CMML classifier, you can use it to create a validation set or a control set.
Create a Fast Active Training Round for an Existing CMML Classifier
After creating a CMML classifier, you can use a Fast Active training round to accelerate training for large batches of documents. When you use Fast Active training, Brainspace favors documents that appear in clusters distant from each other and from those of previous training documents, documents that are similar to many other dataset documents, and documents that have a predictive score near 0.5 under the current predictive model.
To create a Fast Active training round:
Click the Supervised Learning tab.
The Supervised Learning screen will open.
Click a Classifier card.
The Classifier screen will open.
In the Training pane, click the New Training Round button.
The Create Training Round dialog will open.
Click the Round Types dropdown menu, and then click Fast Active.
In the Size of Training Round (Max 5000) text field, type the number of documents to include in the training round.
Click the Continue button.
The Create Training Round dialog will close.
In the Training pane, click the Train Now button.
The training round will begin.
After the training round completes, the Training pane will refresh to show the notebook training round and associated statistics. At any point during CMML classifier training, you can open the classifier in Analytics, add additional training documents, add tags, compare training rounds, or download training round reports. After you have finished training the CMML classifier, you can use it to create a validation set or a control set.
Create a Diverse Active Training Round for an Existing CMML Classifier
After creating a CMML classifier, you can use a Diverse Active training round to train the classifier. When you use Diverse Active training, Brainspace favors documents that are different from each other and from previous training documents, documents that are similar to many other dataset documents, and documents that have a score near 0.5 under the current predictive model.
Note
When Automode is enabled, you can choose Diverse Active to train the classifier automatically for every training round.
To create a Diverse Active training round:
Click the Supervised Learning tab.
The Supervised Learning screen will open.
Click a Classifier card.
The Classifier screen will open.
In the Training pane, click the New Training Round button.
The Create Training Round dialog will open.
Click the Round Types dropdown menu, and then click Diverse Active.
In the Size of Training Round (Max 2000) text field, type the number of documents to include in the training round.
Click the Continue button.
The Create Training Round dialog will close.
In the Training pane, click the Train Now button.
The training round will begin.
After the training round completes, the Training pane will refresh to show the notebook training round and associated statistics. At any point during CMML classifier training, you can open the classifier in Analytics, add additional training documents, add tags, compare training rounds, or download training round reports. After you have finished training the CMML classifier, you can use it to create a validation set or a control set.
Create an Influential Training Round for an Existing CMML Classifier
After creating a CMML classifier using all of the documents or a subset of documents in a dataset, you can use an Influential training round to train the classifier. When you use Influential training, Brainspace favors documents that are different from each other, different from previous training documents, and similar to many other dataset documents.
Note
For the first training round, if you want to automatically select documents to be used for training, you must use an Influential training round.
To create an Influential training round:
Click the Supervised Learning tab.
The Supervised Learning screen will open.
Click a Classifier card.
The Classifier screen will open.
In the Training pane, click the New Training Round button.
The Create Training Round dialog will open.
Click the Round Types dropdown menu, and then click Influential.
In the Size of Training Round (Max 5000) text field, type the number of documents to include in the training round.
Click the Continue button.
The Create Training Round dialog will close.
In the Training pane, click the Train Now button.
The training round will begin.
After the training round completes, the Training pane will refresh to show the notebook training round and associated statistics. At any point during CMML classifier training, you can open the classifier in Analytics, add additional training documents, add tags, compare training rounds, or download training round reports. After you have finished training the CMML classifier, you can use it to create a validation set or a control set.
Create an Ad-Hoc Training Round for an Existing CMML Classifier
After creating a CMML classifier using all of the documents or a subset of documents in a dataset, you can use an Ad-Hoc training round to train the classifier. When you use Ad-Hoc training, you select documents manually to create the training round.
To create an Ad-Hoc training round:
Click the Supervised Learning tab.
The Supervised Learning screen will open.
Click a Classifier card.
The Classifier screen will open.
In the Training pane, click the Train Now button.
The classifier will rebuild the model with any documents that have been manually tagged.
After the training round completes, the Training pane will refresh to show the notebook training round and associated statistics. At any point during CMML classifier training, you can open the classifier in Analytics, add additional training documents, add tags, compare training rounds, or download training round reports. After you have finished training the CMML classifier, you can use it to create a validation set or a control set.
Filter Classifiers
After creating multiple classifiers in Brainspace, you can filter classifier cards to find a specific classifier. To filter classifiers:
Click the Supervised Learning tab.
The Supervised Learning screen will open.
Click the Filter Classifiers text field, and then type a classifier name.
The Classifier cards will begin filtering as you type the classifier name.
After finding a specific classifier, you can click the classifier card to view training statistics or to continue classifier training.
Edit a Classifier’s Name
At any time after creating a CMML classifier, you can edit or completely change the classifier’s name.
To edit a classifier’s name:
Click the Supervised Learning tab.
The Supervised Learning screen will open.
In the classifier card, click the Edit Classifier icon:
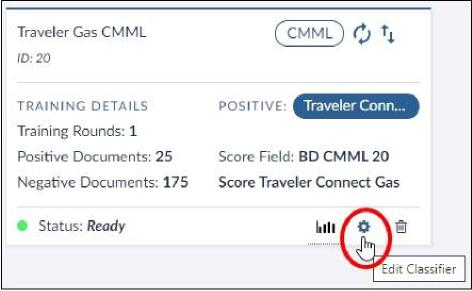
The Edit Classifier dialog will open.
Edit the classifier’s name, and then click the Submit button.
After editing the classifier’s name, you can click the classifier card to view training statistics or to continue classifier training.
Delete a Classifier
At any time after creating a classifier, you can delete it from Brainspace.
Note
Deleting a classifier permanently removes all training statists and training documents from Brainspace.
To delete a classifier:
Click the Supervised Learning tab.
The Supervised Learning screen will open.
In the classifier card, click the Delete Classifier icon:
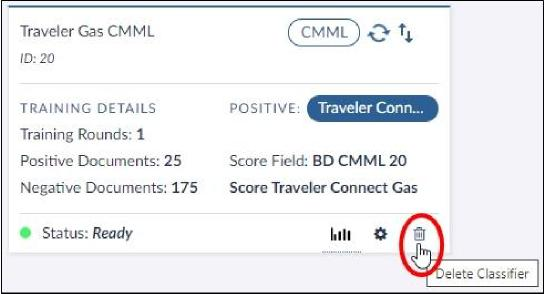
The Delete Classifier dialog will open.
Click the Delete button.
The Delete Classifier dialog will close, and the Supervised Learning screen will refresh.
View Classifier Documents in Analytics
At any time after creating a classifier and running the first training round, you can view the classifier’s documents in the Analytics Dashboard.
To view a classifier’s documents in the Analytics Dashboard:
Click the Supervised Learning tab.
The Supervised Learning screen will open.
In the classifier card, click the View Analytics icon:
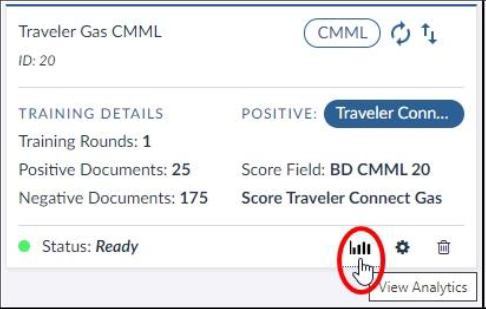
The Analytics Dashboard will open.
After opening the classifier’s documents in the Analytics Dashboard editing the classifier’s name, you can click the classifier card to view training statistics or to continue classifier training.
Switch a Brainspace v6.2.x Dataset’s Relativity® (Legacy) Connector to Relativity® Plus
To use an Adaptive Control Set (ACS) or Automode with a CMML classifier, you must use a Relativity® Plus connector. If you have an existing dataset that uses the legacy Relativity® connector, you can switch the dataset’s connectors to Relativity® Plus in Brainspace v6.3.x.
This process involves creating two dedicated Relativity® Plus connectors in Brainspace v6.3.x, one for switching existing Brainspace v6.2.x datasets from the legacy Relativity® connector to Relativity® Plus and a second Relativity® Plus connector for creating new Brainspace v6.3 datasets going forward that will use CMML classifiers with ACS or Automode. To create a new Relativity® Plus connector, see Create a Relativity® Plus Connector.
Note
If you will be performing an incremental build on a dataset built with the legacy Relativity® connector that now has the Relativity® Plus connector, return to the Relativity® Plus connector dialog and deselect the following overlay fields:
brs_near_dup_status
brs_exact_dup_status
brs_strict_dup_status
Note
If working with a dataset that was originally built with the legacy Relativity® connector that now has the Relativity® Plus connector, you will not be able to perform an incremental build until a full build is completed.
To switch an existing Brainspace v6.2.x dataset from Relativity® (legacy) to a Relativity® Plus connector:
In the user dropdown menu, click Administration:
In the Connectors screen, create a new Relativity® Plus connector (see Create a Relativity® Plus Connector) with the settings appropriate to your environment for Relativity® Base Document URL, API Host Port Number, API Host Machine Name, Authorization Endpoint URL, Token Endpoint URL, Client ID, Client Secret, Concurrency, and, in the Advanced Settings dialog, enable the Use Legacy Field Names (see Use Legacy Field Names.
In the Datasets screen, locate the dataset with the legacy Relativity® connector, and then click the Settings icon:
The Dataset Settings dialog will open.
Note
If you do not have a saved field map for the dataset, toggle the switches to reconfigure the dataset in the Dataset Settings dialog, navigate to the Field Mapping dialog, map the fields, save the field map, and then return to the Dataset Settings dialog.
In the Data pane, click the Delete icon:

The Remove Data Source from [Dataset Name] dialog will open.
Click the Yes, Remove button.
The Dataset Settings dialog will refresh.
Click the Choose Connector button:
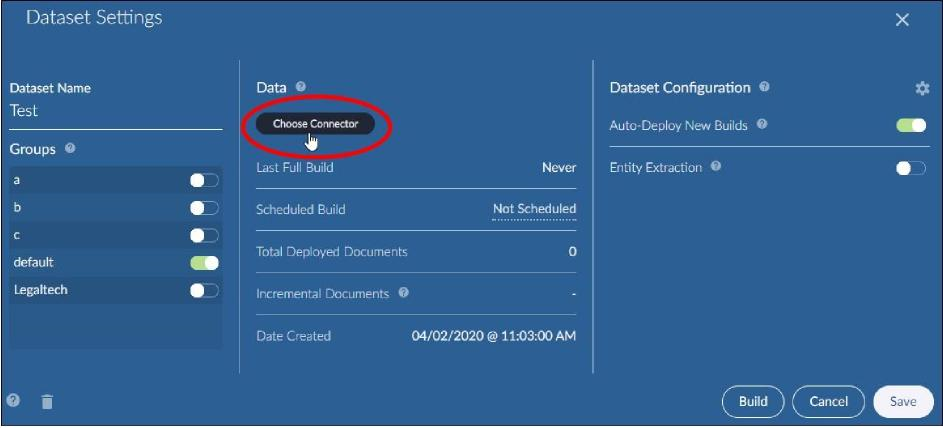
The Choose Connector dialog will open.
Click the Relativity® Plus connector that you created.
In the Choose Connector dialog, click the new Relativity® Plus connector in the list.
Note
If you are not logged in to Relativity®, you will be prompted to enter your Relativity® username and password before you will be able to add the connector. If you are already logged in to Relativity®, the Select a Source dialog will open.
In the Select a Source dialog, click the appropriate Relativity® Workspace folder, and then click the Save and Proceed button.
The Relativity® Saved Search dialog will open.
If the dataset was created using all documents in the Relativity® Workspace, click the Proceed button.
Note
If the dataset was created using a subset of documents, click the appropriate Saved Search in the list before clicking the Proceed button. After clicking the Proceed button, the License Checks dialog will open and run a check on your license document limits.
After Brainspace verifies the license document limits, click the Proceed button.
The Field Mapping dialog will open.
Unmap any of default fields, if necessary, map any additional fields, and then click the Continue button.
The Dataset Settings dialog will refresh.
Note
For information about mapping fields, see Field Mapping Categories and Definitions.
Verify the settings, click the Save button, and then click the Build button. The Dataset Build Options dialog will open.
Choose a build option, and then click the Run This Build Type button. The Schedule Build dialog will open.
Click the Build as soon as possible button.
Note
If you choose to build the dataset in the future, click the Schedule Build Time field, select a date and time, and then click the Save button. The Datasets screen will refresh and show the Dataset Queue build in progress. While the build is in progress, you can click the View Status button to view the build steps in progress. For information on each step in the build process, see (Build Steps). After the build completes successfully, the new dataset will move from the Dataset Queue to the list of active datasets in the Datasets screen, and you are ready to create work products with it.
After changing the dataset’s connector to Relativity® Plus, you are ready to search for documents and to train CMML classifiers using the dataset.
Add a Tag to a Document in a CMML Classifier
As documents are opened for training under Supervised Learning, tags may be added to facilitate organization and grouping. This is done within the Document Viewer.
Under Supervised Learning, select a classifier card.
Open a document card from the results panel at the right.
Under the expanded Document Tags heading you will see tags already added to the document (which may be removed) and have the option to Add Tag To Document, which will open a list of tags and their choices.
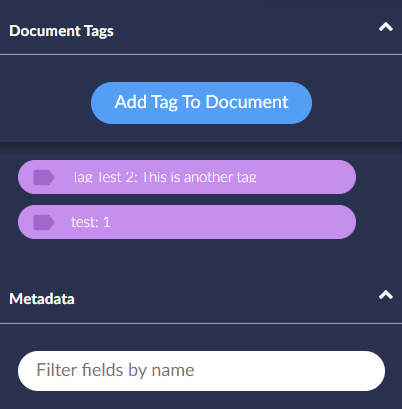
Search for a Tag
You can also search for and revise your past tagging decisions. You can tag documents broadly while the conception of a topic is still evolving, and then clean up that tagging when the issues at hand become clearer.
 |
Open Advanced Search.
Select the Tags tab.
Click in side the tag name field and select on any of the tags available; choices for that tag may also be selected from the list. Once selected, it will appear along with all the other applied search fields.
Click Search; results can be added to a Focus or Notebook.
Filter Fields by Name
With the many fields of metadata associated with Brainspace review and analysis it is sometimes helpful in assessing hit relevance to filter metadata fields. This is done in the Document Viewer under the Tags tab in Advanced Search.
Open a document in Document Viewer.
In the Hit Relevance panel, go to the Metadata heading.
In the Filter fields by name box, enter an example of the name of the field you wish to find and apply.
Fields may be pinned for ready access and retrieval.
See Document Viewer for further details.
Reference Topics
CMML with Connect Tag Flow Diagram
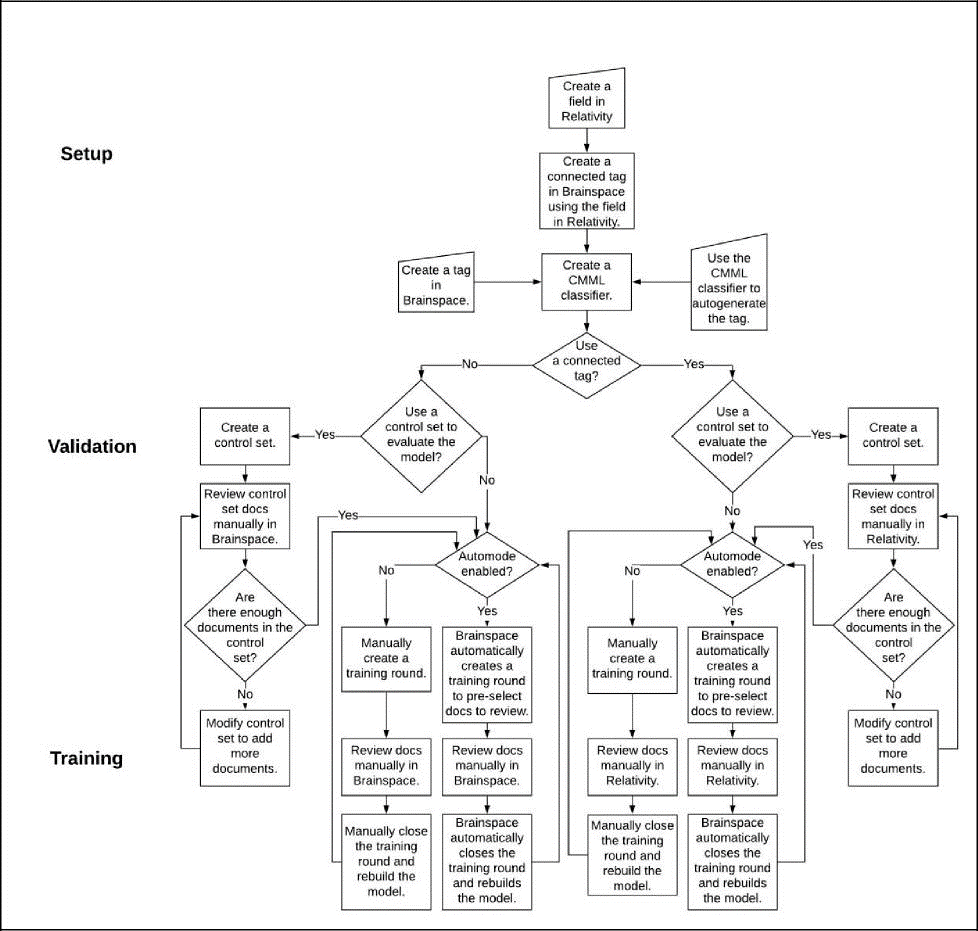
Relativity® Connectors and CMML Compatibility
Brainspace CMML Feature | Relativity® (Legacy) | Relativity® Plus |
|---|---|---|
Automode with Connected Tag | No | Yes |
Automode without Connected Tag | Yes | Yes |
Adaptive Control Set with Connected Tag | No | Yes |
Adaptive Control Set without Connected Tag | Yes | Yes |
Adaptive Control Set
A Brainspace feature to generate statistics for a CMML classifier to achieve defensibility and a measure of when to stop training.
Round Size
The number of documents to be reviewed and tagged in a CMML training round or control set.
Connect Tag
A tag in Brainspace that is associated with a field in a Relativity® Workspace.
Recycled Control Set
A control set that is converted to a training set.
Polling Interval
Frequency at which Brainspace should request review scores to determine if the training round has been completely reviewed in a Relativity® Workspace.
Continuous Multimodal Learning (CMML) Classifier
A classifier that includes the seamless integration of visualizations and supervised learning features designed to support interactive workflows. The goal of CMML is to help users gain access to the most likely relevant or important information in a dataset as quickly as possible by applying predictive ranks to every document that indicate if a document is relevant or not relevant.
CMML Closing
Exhausted ways of finding good documents (especially other types of relevance); declining precision of top-ranked unreviewed documents; declining score of top-ranked unreviewed document validation set (null set) estimate of elusion (or the alternative is unreasonable).
Influential Training Round
Favors documents that are different from each other and from previous training documents, if not the first batch, and favors documents that are similar to many other dataset documents. Used for training the first round and when no manual seed set is available.
Incremental Adaptive Control Set
This feature provides predictive coding-like statistical validation; enabling users to make more confident decisions regarding when to stop training a Continuous Multimodal Learning (CMML) classifier (e.g. Depth for Recall, Precision Recall & F-Measure).
Top Scores Training Round
Transfers work product based on a user specified number of top-ranking documents.
Random Training Round
Chooses a simple random sample of documents that are not already used for training. Use this option when it is necessary to guarantee that documents selected are independent of user input.
Fast Active Training Round
Favors documents that appear in clusters distant from each other and from those previous training documents, are similar to many other dataset documents, and have a score near 0.5 under the current predictive model. Use when fast training is necessary in large batches.
Diverse Active Training Round
Favors documents that are different from each other and from previous training documents, are similar to many other dataset documents, and have a score near 0.5 under the current predictive model. Use when accelerated training is necessary and to avoid any manual influence.
Documents to Review
Number of documents that score greater than or equal to the cutoff value (i.e., documents that get a positive prediction).
Documents to Review with Families
Number of documents in families that include a document that gets a positive prediction.
Total Cost to Review
The result of multiplying documents to review by the specified review cost per document.
Docs to Next Relevant
Estimated distance between the specified cutoff and the next document in the positive class.
Recall
Estimated fraction of documents in the positive class that get a positive prediction.
Precision
Estimated fraction of documents that get a positive prediction that are actually in the positive class.
F-Score
The harmonic mean of recall and precision.
Training Set
All documents that were tagged with a positive or negative value for the classification-associated tag at the end of that round.
Notebook
Forms a training batch from all documents that are in a specified notebook and are not already tagged for the classifier tag. Use for CMML classifier training after appropriate set of training documents in a notebook.
Validation Set
A random sample of documents in a dataset that have not been tagged for classification that is used to estimate the proportion of untagged documents that would be tagged positive if they were reviewed by people. A validation set is a simple random sample from all documents that are available for supervised learning but have not already been tagged with the positive or negative tag for the classification. It is used to estimate the proportion of untagged documents that would be tagged positive if they were reviewed. This proportion is sometimes called “elusion,” though in this case it is the elusion of the review to date, not the elusion of the latest predictive model. A validation set, whether partially or completely tagged, can be recycled as a training batch.